Tag Archives: cheer coach tips

The summer skills audit: stop choreographing the cheer team you wish you had

cheerleading skills audit before choreography

By Steve Pawlyk

Published June 29, 2026

Every coach has done it.

You look at the team in June or July and imagine what they could become by competition season. The stunt group is close. The tumbling is almost there. The flyer has the body position if she stays tight. The bases can hit it when everyone is fresh. The jumps are not sharp yet, but they will be.

So the routine gets built around the future version of the team…a version that may never show up.

This is where a summer skills audit helps. It forces coaches to separate what athletes can actually hit from what they might hit later. That difference matters before choreography starts, before music gets ordered, and before athletes spend weeks learning a routine that does not fit them.

The goal is not to lower expectations. The goal is to build a routine with clean, realistic skills and smart upgrade paths. Coaches can still push the team. They just need to know which skills belong in the routine now, which skills need more time, and which skills should stay out until the team proves they can handle them.

What is a summer skills audit?

A summer skills audit is a routine-readiness check; not a tryout. It’s not a punishment or a way to embarrass athletes who are behind. It is a coaching tool.

The audit asks one question over and over: Can this team perform this skill safely, cleanly, and consistently enough for choreography?

cheerleading practice plan

A skill that hits once in practice is not ready. A stunt that works only with one perfect group is not ready. A tumbling pass that lands when the athlete feels good but disappears under pressure is not ready. A pyramid section that needs five coach saves before it works is not ready. Summer is when coaches should find that out. Too many routines get choreographed around hope. Hope is fine in a team meeting.  It’s not a routine strategy.

Why coaches overestimate summer skills

Coaches usually do not overestimate their teams because they are careless. They do it because cheer makes almost-finished skills look tempting.

A stunt that hits three times in a row can feel routine-ready. Then the group loses it when they add counts, music, formations, fatigue, and pressure. A tumbler who lands a pass on a dead mat can look ready. Then the pass changes when the athlete has to wait through a transition, run from a new corner, and perform after jumps.

A flyer may hit a body position during drills. Then the same body position falls apart inside a full sequence with choreography before and after it. That’s normal…practice skills and routine skills are not the same thing. A summer skills audit closes that gap. It asks athletes to prove the skill in conditions that look more like the routine.

The 8-out-of-10 rule

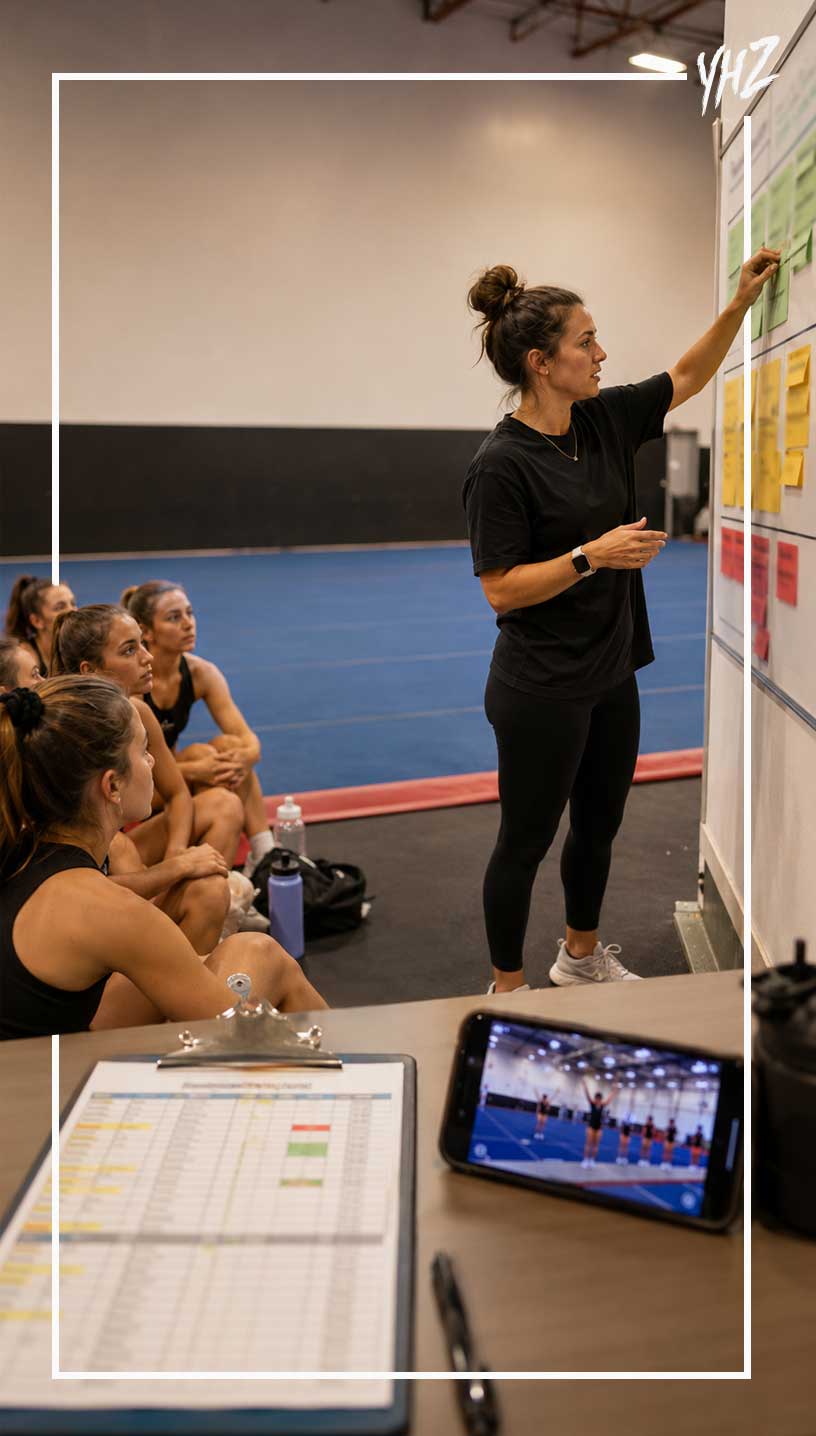
A clean routine needs skills that repeat. For most teams, a useful standard is simple: if a skill does not hit cleanly at least 8 out of 10 times in practice, it should not be locked into choreography yet. That doesn’t mean the team stops training it. It means the coach treats it as an upgrade, not a foundation.

Use 3 categories:

Green skills are ready. They hit most of the time. Athletes understand the timing. Coaches do not have to stop practice every time the skill appears. The skill can handle counts, music, and pressure.

Yellow skills are close. They hit sometimes, but they still need help. Timing changes. Technique slips. Groups need extra resets. These skills may work in a routine if the coach builds a backup plan.

Red skills are not ready. They miss too often, need heavy spotting, create safety concerns, or only work when conditions are perfect. Red skills belong in training, not choreography.

The categories should stay flexible. A yellow skill can become green. A green skill can become yellow when the team adds movement or music. The audit is not a one-day verdict. It is a way to keep the routine honest.

Need Competition Music Blue 1

Audit stunts first

Stunts deserve the first audit because they take the most time to fix after choreography. A shaky stunt section does not stay isolated. It affects formations, transitions, pyramid timing, music pacing, athlete confidence, and the rest of practice. If a coach builds the routine around stunt skills that are not ready, the team spends the whole season chasing the routine instead of cleaning it.

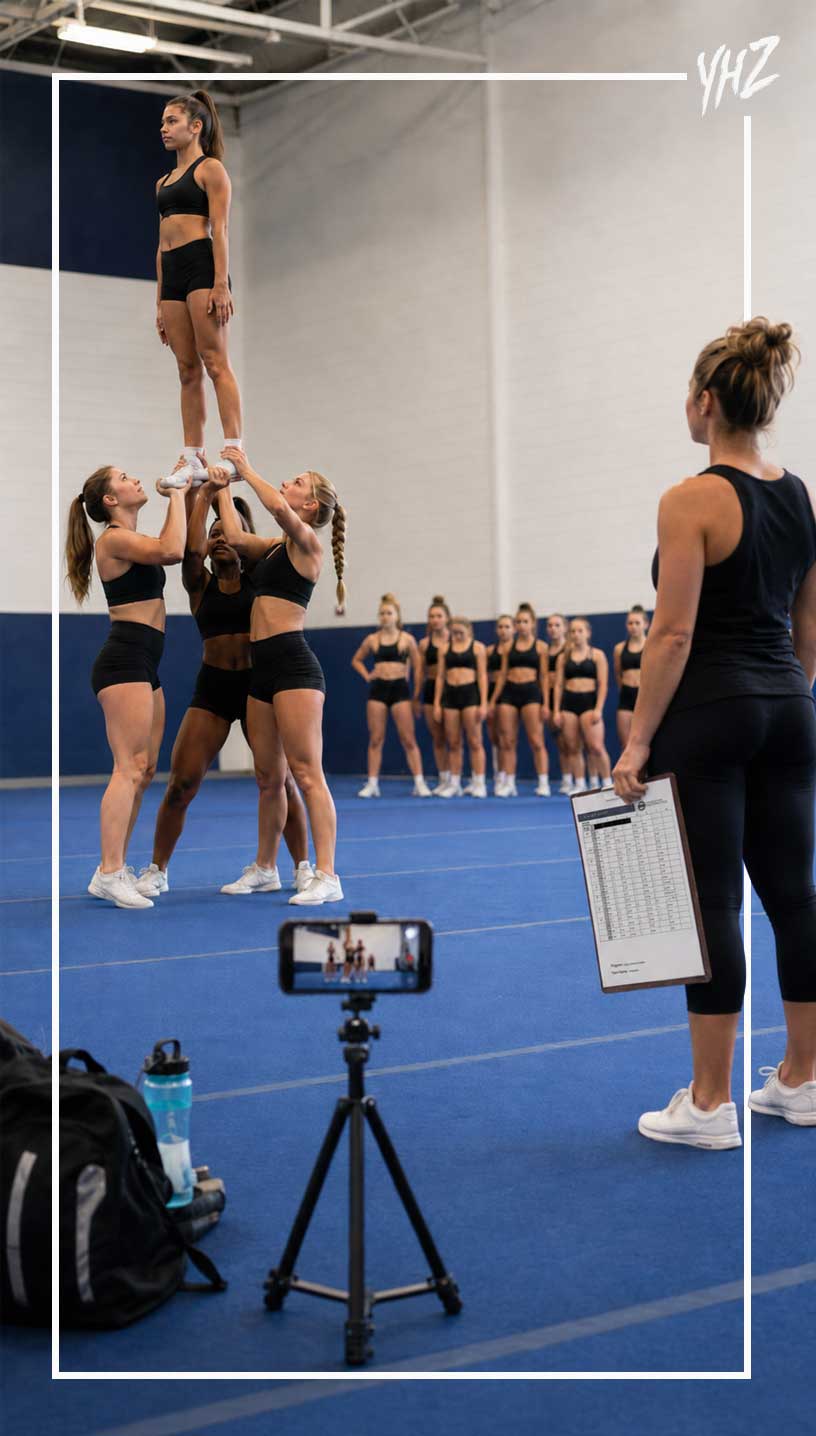
Start with each stunt group by itself. Ask the group to perform the skill ten times. Track clean hits, shaky hits, missed grips, late dips, unstable body positions, rough dismounts, and coach saves. Don’t count a skill as clean just because nobody fell.

A clean hit should look controlled. The flyer should show the intended body position. Bases should stay under the stunt. The back spot should not rescue every rep. The dismount should land safely. Athletes should know where they go next.

Then test the skill in motion. Add the entrance. Add counts. Add the transition before it. Add the transition after it. Add nearby groups. Add music when possible.

This is where the truth usually shows up. A stunt that looks good in isolation may not survive the routine. That does not make the skill useless. It tells the coach where the skill belongs.

Maybe it stays in training. Maybe it moves later in the routine. Maybe it gets simplified. Maybe only one group performs it. Maybe it becomes an upgrade after the first competition. That decision is easier in July than October.

summer skills audit

Do not let one strong stunt group trick you

One strong group can make a team look more advanced than it is. That group hits the elite skill. Everyone gets excited. The routine gets built around that level of difficulty. Then the other groups spend months trying to catch up.

This is a bad trade.

Competition routines are judged as full-team products. If one group looks great and two groups fight for survival, the routine does not look strong. It looks uneven. The summer skills audit should judge the team, not the best group.

If only one group can hit the skill, the coach has a choice to make. Feature that group intentionally, or choose a skill the full section can hit. Both choices can work. Pretending the whole team owns the skill does not work.

A clean stunt section with slightly lower difficulty will usually age better than a high-difficulty section that scares everyone in the gym.

Audit tumbling under routine conditions

Tumbling is another place where coaches overcount skills.

An athlete may have a pass. That does not mean the pass belongs in the routine.

Test tumbling in the way the routine will use it. If the athlete has to run from a corner, test that corner. If the pass comes after jumps, test it after jumps. If the pass comes after a long transition, test it after movement. If the athlete has to wait on music, test the timing.

A tumbling pass should not count as routine-ready until the athlete can land it with the same setup they will use in the routine.

Coaches should also separate technical readiness from performance readiness.

A pass may be legal and land safely, but still look messy. Bent legs, low chest, uncontrolled rebounds, and scary landings can hurt the routine. They can also make the athlete less confident over time.

Some passes need more training. Some need a different placement. Some need to come out until the athlete can hit them without the whole section holding its breath.

That is not negative coaching. That is good routine design.

Audit jumps without lying to yourself

Jumps often get treated as a small section. They should not.

A weak jump section can make a polished routine look unfinished fast. Bent knees, low height, loose arms, bad timing, and messy landings are easy to see. Judges do not need replay to notice them.

A summer jump audit should test three things: technique, timing, and recovery. Technique asks whether the jumps have the shape the coach wants. Timing asks whether the team can hit together. Recovery asks whether athletes can land and move into the next skill without falling apart.

That last part matters. Many jump sections look acceptable until the team has to tumble, transition, or stunt immediately after. If the jumps drain the athletes so much that the next section suffers, the coach needs to know that now.

Do not build the jump section around the one athlete with great flexibility. Build it around what the team can hit together. Clean, synchronized jumps usually beat ambitious jump combinations that land like popcorn.

cheer routine planning

Audit pyramids in pieces

Pyramids can fool coaches because small pieces may work even when the full structure is not ready. Start with the parts.

Can each group hit its job? Can the bracers stay connected? Can flyers maintain body positions? Can bases move safely? Can the team hit the timing without a coach talking them through every count? Then connect the pieces.

This is where pyramid problems usually appear. Groups that hit alone may not travel well. Bracers may arrive late. Flyers may look unsure. Transitions may take more counts than expected. The pyramid may technically hit, but the visual may not read from the front.

The audit should include a front-view check. Record the pyramid from the judges’ angle and watch it without sound. If the visual does not make sense on video, music will not fix it. Pyramid difficulty should serve the routine. It should not become a maze the team barely survives.

Audit transitions like skills

Transitions are skills. Coaches do not always treat them that way, but they should.

A transition needs timing, spacing, body control, traffic awareness, and performance quality. Bad transitions make strong skills look worse. They also create avoidable stress for athletes.

During the summer audit, coaches should identify the athletes who struggle with spacing, speed, direction changes, and formation responsibility. That information should shape choreography.

Some teams can handle fast, layered transitions. Some teams need cleaner pathways and simpler movement. Some teams need extra counts because they have younger athletes, mixed experience levels, or big formation changes. That does not mean the routine has to feel slow. It means the routine has to move in a way the team can execute.

A coach who ignores transition skill level will end up cleaning the same traffic problems all season.
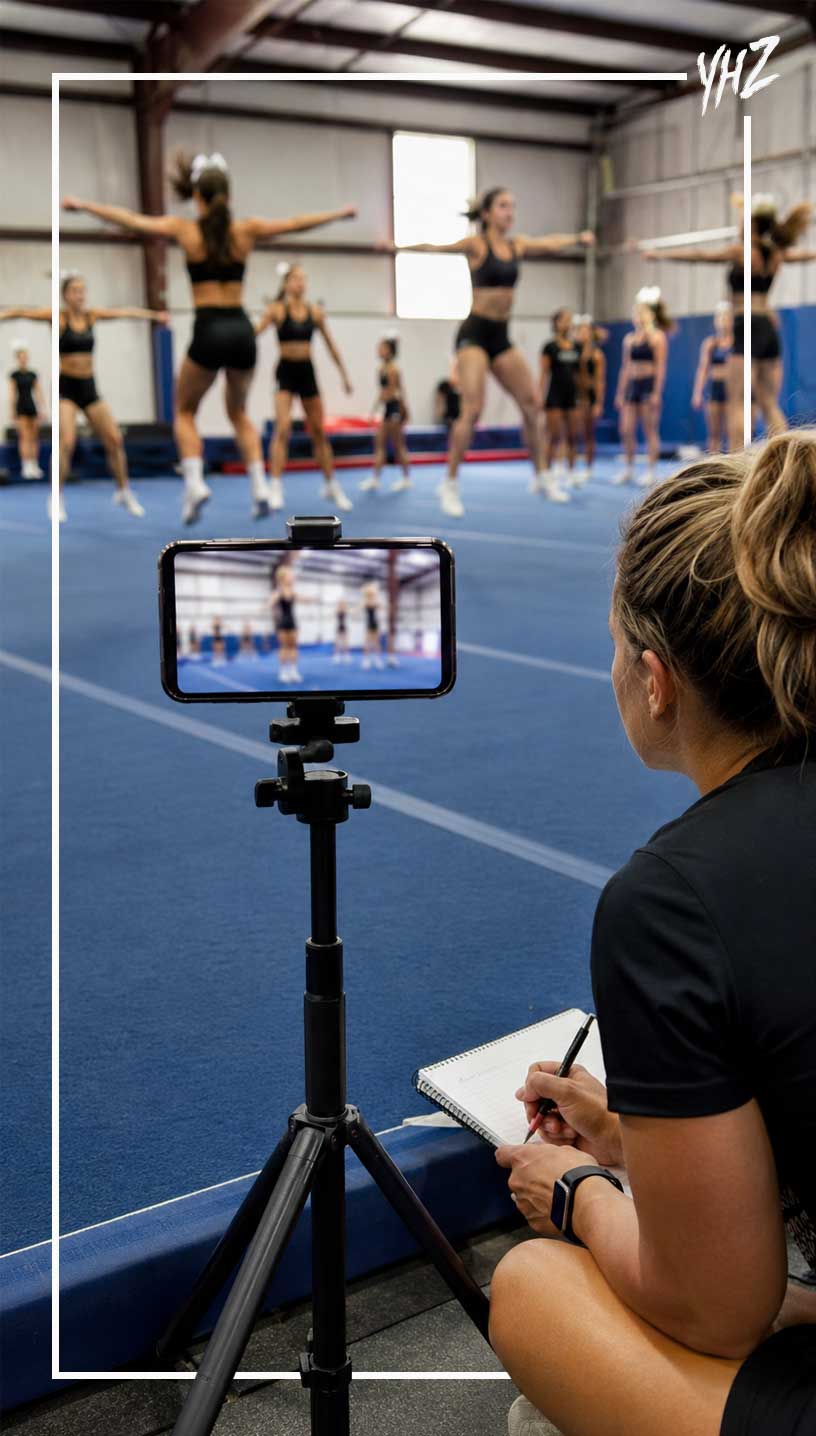
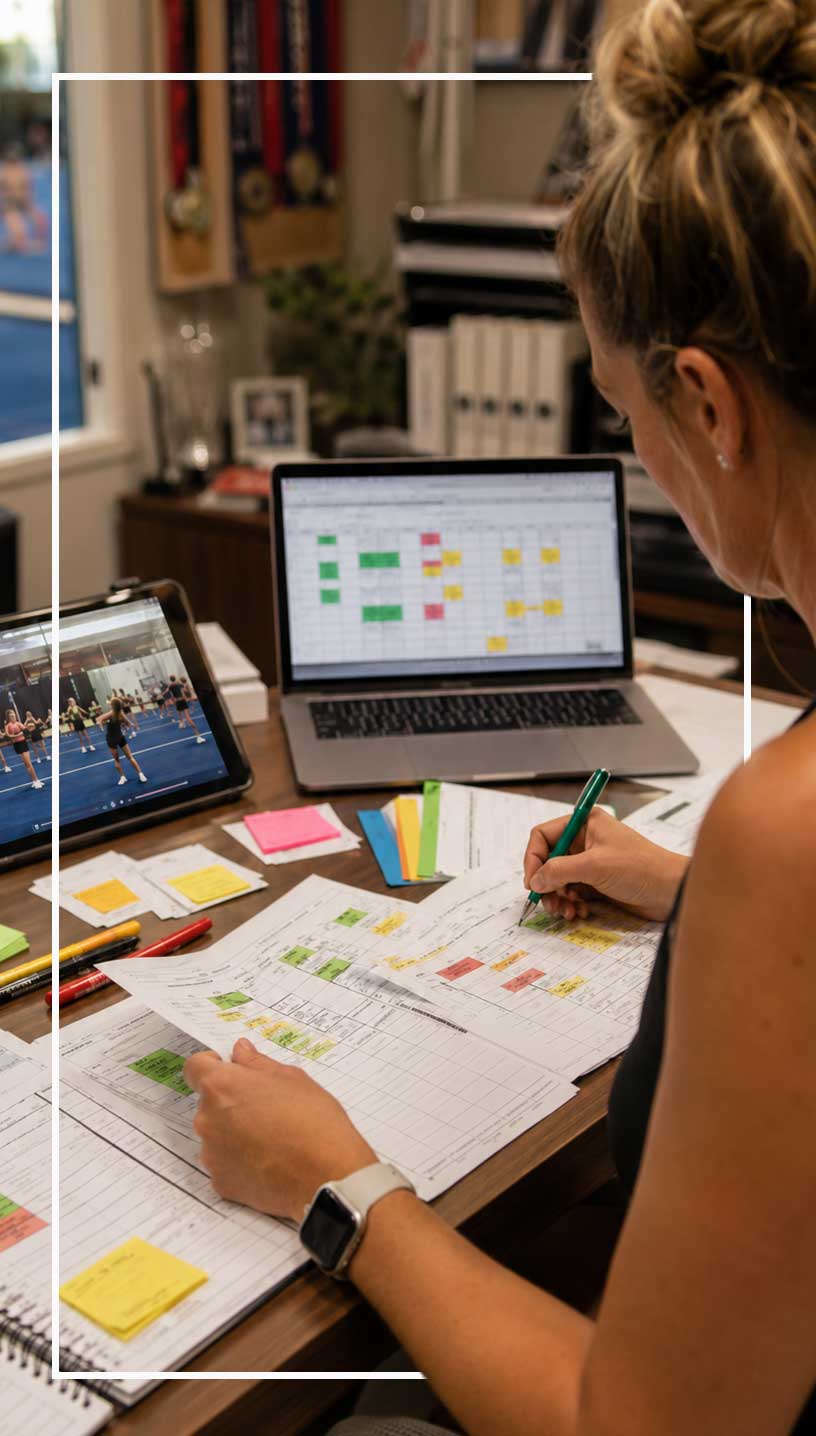
Film everything

Video makes the audit harder to argue with.

Athletes often feel like a skill hit because they survived it. Coaches may remember the best rep because it was exciting. Parents may hear that a skill is close and assume it should go in the routine.

Film solves a lot of that.

Record stunt reps, tumbling passes, jump sections, pyramid pieces, and short routine-style sequences. Watch them from the front. Watch them without stopping after the first hit. Watch the misses too.

The camera shows what the judges will see.

It also helps coaches spot patterns. Maybe a stunt group misses every time the flyer rushes the body position. Maybe a tumbler changes technique when tired. Maybe the jump timing problem starts with the arms, not the legs. Maybe the transition looks messy because two athletes cross the same lane.

Those details are easy to miss live.

A summer skills audit does not need fancy software. A phone camera and honest eyes are enough.

summer skills audit

Create a no-drama scoring system

A skills audit can get emotional if athletes think every result is a judgment of their worth. Keep the language clean.

Do not label athletes as good or bad. Label skills as ready, close, or still training. That distinction matters.

A flyer is not a problem because one body position is inconsistent. A base is not a failure because one grip needs work. A tumbler is not behind as a person because one pass is not routine-ready.

The audit should help athletes see the path forward.

Use simple notes:

Ready for routine
Needs more reps
Needs technique fix
Needs safer version
Use only in featured spot
Train as upgrade
Do not use yet

That kind of language gives coaches useful information without turning the audit into a public ranking.

Build the routine with a base version and upgrades

The smartest coaches do not choose between easy and hard. They build layers.

Start with a base routine the team can hit. Then plan upgrades that can replace sections when the team earns them.

For example, a stunt group may start with a cleaner prep-level body position, while training the extended version as an upgrade. A tumbling section may start with the passes athletes can land under pressure, while keeping harder passes ready for later. A pyramid may use a safer connection first, then add a harder visual once timing improves. This approach gives the team confidence early.

It also keeps the routine from becoming stale. Athletes can work toward upgrades without feeling like the first version is a failure. The base version should still look intentional. It should not look like a watered-down placeholder. It should be choreographed to score as cleanly as possible.

If the upgrade never becomes safe or consistent, the team still has a routine. That is the point.

Set deadlines for routine decisions

A skill cannot stay “almost ready” forever. Coaches need decision deadlines. Without them, the team keeps waiting for skills that may not arrive in time.

Set a date before choreography when each major skill must prove itself. Set another date after choreography for upgrades. Set a final date before the first competition when the coach stops adding risk and starts cleaning.

The exact timeline depends on the program, but the principle stays the same. At some point, a skill either belongs in the routine or it does not. This protects the team. It also protects practice time.

A team that changes major routine sections too late loses cleaning reps. Athletes get nervous. Coaches get frustrated. Music edits pile up. The routine starts to feel temporary. Temporary routines do not perform with confidence.

cheerleading tumbling audit

Watch for the “one more week” trap

“Give it one more week” can become a season-long habit. Sometimes one more week makes sense. A group may need reps. An athlete may be coming back from vacation. A stunt may need one technical fix. But coaches should ask what will actually change in that week.

Will the team get more reps with the full group present? Will a coach fix a specific technique problem? Will the athlete get private tumbling work? Will the group drill the entry that keeps breaking?

If the answer is no, one more week may only delay the decision. Hope is not a training plan.

When a skill stays inconsistent after repeated chances, the coach should move it out of the routine and keep training it separately. That choice may feel disappointing in the moment. It usually saves the routine later.

Match skills to the team’s identity

The summer audit should not only ask what the team can do. It should ask what the team can sell.

Some teams are explosive. Some are sharp and clean. Some have strong stunt technique. Some have big personalities. Some have excellent dancers. Some have powerful tumbling but need simpler transitions. Some have young athletes who perform better when the routine is clear and confident. The routine should fit that reality.

Do not build a routine that hides the team’s best qualities because everyone is chasing difficulty. Use the audit to find what the team can own.

If the team has strong jumps, give the jump section a real moment.

If the team has one standout tumbler, feature that pass without forcing everyone else into skills they cannot match.

If the team performs well, give them music and choreography that let them connect with the crowd.

If the team has clean stunts, do not bury them inside overcomplicated transitions.

A good routine makes the team look more like itself. A bad routine makes the team look like it is pretending.

Use the audit to guide music and count sheets

The skills audit should feed directly into the count sheet.

If the team needs extra time for stunt setups, the count sheet should show that. If a transition needs more room, plan the counts before the music gets built. If the pyramid has one major visual, make sure the music supports that moment. If jumps need a clean recovery before tumbling, do not cram the next section too close.

Music cannot solve a routine that ignores skill readiness. A producer can help with pacing, energy, voiceovers, sound effects, and section changes. But the coach has to know what the team can actually execute.

The audit gives the music producer better information. It also helps the choreographer make smarter choices. This is where planning pays off. The routine feels less forced because the counts, skills, and music all come from the same honest picture of the team.

What to do when parents push for harder skills

Parents hear what their athlete says. Athletes often say the skill is close. That can create pressure.

A parent may ask why a stunt is not in the routine. An athlete may say they hit it at practice. Another parent may compare the team to a rival program. Someone may post a video of one successful rep and wonder why the coach will not use it. This is where the audit helps.

The coach can explain that routine decisions come from consistency, safety, and full-team execution. One hit does not decide choreography. Ten reps tell a better story. Routine conditions tell an even better one. Keep the message simple.

The team will train upgrades. The routine will use the skills that give the team the best chance to hit. The goal is not to avoid difficulty. The goal is to earn it.

Most parents can understand that when the coach explains it before emotions take over.

A sample summer skills audit plan

Coaches can run a basic audit in one or two practices. Start with stunts. Test the main skills each group wants to use. Track clean hits out of ten. Add entries and exits after the first round.

Move to tumbling. Test standing tumbling and running tumbling from routine-style setups. Record landings, timing, and consistency.

cheer tumbling readiness

Run jumps as a group. Check height, timing, arm placement, landings, and recovery into the next section. Break down pyramid pieces. Test each group, then connect sections. Film from the front.

Finish with transitions. Give athletes formation changes and watch spacing, speed, and confusion points. After practice, sort the results into green, yellow, and red.

Then make routine decisions from that list.

Green skills can go into the first choreography plan.

Yellow skills need backup versions.

Red skills stay in training until they prove they are ready.

The audit does not need to be complicated. It needs to be honest.

The coach’s real job

Cheer coaches live between ambition and reality. Push too little, and the team never grows. Push too much, and the routine becomes a weekly emergency.

The summer skills audit helps coaches find the middle. It gives athletes room to improve without letting unfinished skills take over the routine. It helps choreographers build around truth. It helps music producers support the routine instead of guessing. It helps parents understand why consistency matters more than one good video.

Most of all, it protects the team from spending the season chasing a version of itself that only exists in the coach’s imagination.

Build for the team in front of you.

Train for the team they can become.

Those are different jobs. Good coaches know when they are doing each one.

Steve Pawlyk Signature Full

IPP's Premade Mixes are USA Cheer Compliant and customizable!  Add Sound FX, swap songs, & more!  Add your Team Name to the mix for only $10! 

SLAM artwork
Full_Out_130 mp3 image
1 minute cheer mix
WAKE UP THE FIRE
SLAM artwork
WAKE UP THE FIRE
Full_Out_130 mp3 image
1 minute cheer mix

Teaching Perfect Arm Angles How to Correct Chicken Wings Dropped Elbows and Soft Wrists

Teaching Perfect Arm Angles How to Correct Chicken Wings Dropped Elbows and Soft Wrists

By Steve Pawlyk

Published November 7, 2025

In competitive All-Star cheerleading, sharp motions define the difference between a clean, high-scoring routine and one that looks unrefined. Teaching athletes how to execute crisp, dynamic arm movements with precision and body control is fundamental to building strong visuals and synchronicity across your team. This guide walks All-Star coaches through a technical, step-by-step process for teaching sharp motions effectively – from individual drills to full-team synchronization – while addressing common errors, timing issues, and body alignment problems that often hold athletes back.

Understanding the Mechanics of Sharp Motions

Definition:
A “sharp motion” is a quick, controlled movement that stops abruptly at a precise endpoint with visible muscle engagement. It requires correct arm path, shoulder alignment, and total-body engagement.

Core Elements of Sharpness:

  • Tension: Muscles are fully engaged without appearing rigid.
  • Accuracy: Arm placement hits exact angles (e.g., 45°, 90°).
  • Timing: Motion reaches its final position simultaneously across athletes.
  • Control: Movement stops cleanly, with no bounce or wobble.

Key Muscles Used:
Deltoids, trapezius, latissimus dorsi, biceps/triceps, and core stabilizers.

cheer arm angles

Step-by-Step: Teaching Sharp Motions One-on-One

Step 1: Establish Muscle Awareness

  • Drill: Have the athlete hold a High V for 10 seconds. Then cue:
    “Tighten your arms until they feel like steel – now breathe without letting the arms move.”
  • This develops static control and shoulder stability.

Step 2: Teach Arm Pathways

  • Use mirror feedback. Demonstrate a motion slowly, tracing the arm path.
  • Cue: “Travel through the air like you’re slicing – not floating.”
  • Have the athlete practice T → High V → Low V transitions at half-speed, then full-speed, maintaining tight paths and deliberate stops.

Step 3: Reinforce Visual Symmetry

  • Correct uneven elbows by cueing: “Both elbows should look like twins – same height, same line.”
  • Photograph or record the athlete mid-motion for visual correction.

Step 4: Add Controlled Speed

  • Once the athlete can execute cleanly at half-speed, use a metronome or counts.
  • Cue: “Hit, hold, snap back – no extra noise in between.”

One-on-One Focus: Keep feedback specific and immediate – correct after every rep. For developing athletes, emphasize “clean over fast.”

Teaching Small Groups: Building Consistency

When moving from individual correction to group work (3-5 athletes), the goal shifts from precision to uniformity.

Step 1: Synchronization Drills

  • Drill: Assign one athlete as the “lead” and have others match their timing and stop point.
  • Use 8-count tracks at 100 – 120 BPM for consistency.

Step 2: Peripheral Awareness

  • Cue athletes to use side vision to check alignment:
    “Your arms should land in the same line as your neighbor’s. If you see a hand out of place, match it.”

Step 3: Micro-Timing Adjustments

  • Record group motions in slow-motion.
  • Identify the athlete who hits early or late, then isolate and re-sync.
  • Use rhythmic clapping or verbal counts (“1-and-HIT”) to reinforce team timing.

Teaching Full-Team Precision

Step 1: Formations and Spacing

  • Sharp motions lose impact when spacing drifts. Tape lines on the floor to keep spacing exact (arms-length apart).
  • Cue: “Your visual space is part of the motion – protect your square.”

Step 2: Layered Instruction

  1. Start with silent run-throughs – no music, just visual hits.
  2. Progress to count-based: “5-6-7-8!”
  3. End with music-speed execution and pause drills between counts to check visuals.

Step 3: Visual Synchronization Drills

  • Use video playback and freeze frames at key motions (High V, T, Punch, etc.) to identify misalignments.
  • Assign “correction partners” – athletes who check each other’s arm levels and tension before full runs.
Need Competition Music Blue 1

Coaching Language That Works

The phrasing you use directly influences athlete response. Avoid abstract cues like “be sharp” or “hit harder.” Replace them with sensory and mechanical instructions.

Effective Coaching Phrases:

  • “Imagine your arms are blades cutting the air.”
  • “Snap into place like a magnet hitting metal.”
  • “Hold tension like you’re trying to flex your arms into the floor.”
  • “Freeze, don’t bounce.”
  • “Clean lines over fast arms.”

Common Athlete Errors and How to Correct Them

Error

Cause

Correction

Bent elbows

Weak triceps or poor tension awareness

“Lock but don’t lock out – think steel, not wood.” Drill with 3-lb dumbbells.

Uneven arms

Shoulder misalignment or hand dominance

Train both sides equally. Use mirror or laser alignment drills.

Wobbly stops

Lack of core engagement

Add plank and hollow hold conditioning. Cue: “Freeze from your ribs, not your wrists.”

Soft wrists

Weak tension through forearm

Incorporate “blade hand” drills – open palm tension holds for 8 counts.

Sloppy transitions

Rushed counts or overextension

Slow down, isolate each transition. “Every path is a punch, not a wave.”

Progressive Drills for Mastery

  1. Isolation Drill: Perform each motion slowly to counts – no transitions. Focus only on angle accuracy.
  2. Snap Drill: Hit T → High V → Low V → T in rhythm to a metronome, pausing between each to check angles.
  3. Mirror Match Drill: Two athletes face each other and mirror motions simultaneously. Immediate visual feedback reinforces synchronization.
  4. Resistance Band Drill: Attach light bands to wrists. Perform motions while maintaining band tension – builds strength and control.
  5. Full-Team Clean Hit Challenge: Every athlete must freeze at the end of each motion; any visible bounce or movement restarts the count.

Building Endurance for Sharp Motions

Sharp motions require not only precision but also endurance. Incorporate these conditioning elements:

  • Shoulder holds: 3 sets of 30-second High Vs with light dumbbells.
  • Core stabilization: Hollow holds and plank variations to reduce upper-body wobble.
  • Repetition drills: 50-count sets of full-out motions to simulate routine fatigue.

Cue during conditioning: “Your arms should look the same on count 1 as they do on count 50.”

chicken wings cheer

When an Athlete Struggles

Common Struggles:

  • Arms aren’t hitting sharp or fast enough:

    • Cause: Lack of muscle engagement or understanding of “motion lock.”

    • Fix: Have the athlete perform slow-motion hits against light resistance bands to feel the tension through shoulders, triceps, and wrists. Cue “lock from the shoulder, not the elbow.” Reinforce with short-count drills — e.g., “1–hit, 2–freeze.”

  • Elbows bend or wrists flop at the end of the motion:

    • Cause: Weak upper-arm engagement or fatigue during repetition.

    • Fix: Add static arm holds (10 seconds per motion) and isometric presses against a wall. Cue “squeeze through your arms like you’re cracking glass.”

  • Angles inconsistent between left and right sides:

    • Cause: Poor proprioception or shoulder imbalance.

    • Fix: Drill in front of a mirror or record video feedback. Have the athlete hit one motion at a time and freeze for visual alignment checks. Cue “match the mirror, not your memory.”

  • Athlete can’t find visual uniformity in team formations:

    • Cause: Over-focusing on personal execution instead of spatial awareness.

    • Fix: Use “mirror pairs” — partner the athlete beside your cleanest performer and run synchronized drills. Cue “your job is to disappear into the line.”

  • Timing late or early on counts:

    • Cause: Overthinking or reacting visually instead of audibly.

    • Fix: Practice hitting on a metronome beat or 8-count track. Cue “hit the sound, not the sight.”

Coach Tip:
When a particular athlete struggles to “feel” the sharpness, try tactile feedback. Have the athlete hold a lightweight resistance band across both wrists or a small towel between hands — this creates tangible tension through the arms and instantly teaches them what “tight” actually feels like. The goal isn’t punishment; it’s awareness. Once they feel it, they can replicate it without the tool.

Teaching sharp motions isn’t about speed — it’s about accuracy, control, and tension. Start slow, demand consistency, and build synchronization from the ground up. The payoff is visual cleanliness, team unity, and a routine that commands attention from judges the moment the first motion hits.

Stay tuned for more coaching tips from our Cheer How-To Series 

Steve Pawlyk Signature Full

IPP's Premade Mixes are USA Cheer Compliant and customizable!  Add Sound FX, swap songs, & more!  Add your Team Name to the mix for only $10! 

SLAM artwork
Full_Out_130 mp3 image
1 minute cheer mix
WAKE UP THE FIRE
SLAM artwork
WAKE UP THE FIRE
Full_Out_130 mp3 image
1 minute cheer mix

Teaching the Hurdler Jump: A Comprehensive Guide for Competitive Cheer Coaches

Teaching the Hurdler Jump A Comprehensive Guide for Competitive Cheer Coaches

By Steve Pawlyk

Published July 9, 2025

If you’ve been coaching cheerleading for any length of time, you know that certain skills just make or break a routine. The hurdler jump? It’s definitely one of those game-changers. After spending years in the trenches coaching everyone from tiny mini athletes to college competitors, I’ve learned that teaching this jump isn’t just about demonstrating and hoping for the best. It’s about understanding the science, breaking down the progression, and meeting each athlete where they are.

So grab your coffee (or protein shake – no judgment here!), and let’s dive deep into everything you need to know about teaching the hurdler jump to young competitive cheerleaders.

Understanding the Anatomy of a Hurdler Jump

Before we even step foot on the mat, let’s get crystal clear on what we’re teaching. I’ve seen too many coaches confuse variations or teach hybrid versions that end up hurting scores at competition.

The Front Hurdler

This is probably what you’ll teach most often. Picture this: your athlete is positioned at a 45-degree angle to the crowd (this angle is crucial – straight-on looks awkward, and full profile hides the back leg). The leg furthest from the crowd will come up straight in front as high as possible, while the other bends behind. Arms can be in a touchdown or in a high V.

The key here is that straight leg – it should be reaching for the sky, ideally getting close to the athlete’s nose level. The back leg? That’s where things get interesting. The knee should be bent with the foot pulled up toward the glutes, and the knee itself should be pointing down toward the ground. Think of a track hurdler clearing a hurdle – hence the name!

The Side Hurdler

Less common but equally impressive when done right. Here, one leg extends to the side, while the other bends toward the back with the knee facing out. Arms should be in a “T” motion. The main difference? That bent knee faces the crowd rather than the ground, and the whole body orientation is different.

The “Not-a-Hurdler” (aka The Herkie)

Quick story time: Named for Lawrence Herkimer, the founder of the National Cheerleaders Association, this jump is similar to a side-hurdler, except that instead of both arms being in a T-shaped motion, both arms are opposite of what the leg beneath them is doing. The legend goes that Herkie couldn’t quite nail the hurdler, so he created his own version. It’s different enough that judges will dock points if your athletes throw a Herkie when they’re supposed to hit a hurdler!

Prerequisites: Building the Foundation

Here’s where I might ruffle some feathers, but I’m going to say it anyway: if your athletes aren’t ready, pushing them into hurdlers is a recipe for injury and frustration. Let’s talk about what “ready” really means.

Flexibility Requirements

Flexibility is the first area a cheerleader should address. If a cheerleader is tight throughout her hamstrings, groin, or lower back they must stretch. Range of motion is the number one cause of injuries.

Here’s my flexibility checklist for hurdler-ready athletes:

Hamstring Flexibility Test:

  • Have the athlete lie on their back
  • Lift one straight leg up while keeping the other flat on the ground
  • They should reach at least 90 degrees without the bottom leg lifting
  • Less than that? Time for targeted stretching

Hip Flexor Mobility Test:

  • Lunge position with back knee on the ground
  • Push hips forward gently
  • If they feel extreme tightness or can’t keep their torso upright, those hip flexors need work

Dynamic Flexibility Check:

  • Standing leg swings forward and back (should reach at least hip height)
  • Standing kicks to the front (controlled, not ballistic)
  • If they’re struggling here, the jump will be a struggle too
Need Competition Music Blue 1

Strength Prerequisites

Flexibility without strength is like having a sports car with no engine. Here’s what your athletes need:

Core Strength: Can they hold a hollow body position for 30 seconds? If not, start there. The core is what keeps that chest up during the jump.

Leg Power: Single-leg squat test – can they do at least 5 on each leg with good form? This translates directly to jump height.

Hip Flexor Strength: Have them lie on their back and lift one straight leg up and down 10 times without touching the ground. If they’re shaking by rep 5, you’ve found a weakness to address.

The 12-Week Progressive Teaching Method

After years of trial and error (emphasis on the error in my early coaching days), I’ve developed this progression that actually works. The timeline can be compressed or extended based on your athletes’ abilities, but don’t skip steps!

Weeks 1-3: Flexibility and Strength Foundation

Week 1: Assessment and Flexibility Focus

Start every practice with what I call the “Hurdler Prep Circuit”:

  • 5 minutes of dynamic warm-up (high knees, butt kicks, leg swings)
  • 10 minutes of targeted stretching:
    • Pike stretch holds (30 seconds x 3)
    • Butterfly stretch for hip opening (30 seconds x 3)
    • Standing quad stretches (30 seconds each leg x 2)
    • Seated hurdler stretch (the actual position) – 30 seconds each side x 3

Ground position work:

  • Have athletes sit in the hurdler position on the floor
  • Focus on proper positioning: straight leg fully extended, bent leg tucked comfortably
  • Hold for 30 seconds, switch sides
  • Progress to lifting the arms to touchdown position while seated

Week 2: Building Specific Strength

Add resistance work:

  • Theraband kicks: 3 sets of 10 each leg (front and side)
  • Single-leg glute bridges: 3 sets of 10 each leg
  • Core work specific to jumps:
    • Hollow holds (work up to 45 seconds)
    • V-ups focusing on keeping chest high (3 sets of 10)
    • Russian twists with emphasis on tall posture (3 sets of 20)

Continue flexibility work and add:

  • Partner stretching for deeper range of motion
  • PNF stretching techniques (contract-relax method)

Week 3: Movement Patterns

Time to get moving:

  • Walking hurdlers: Literally walk across the floor hitting the position with each step
  • Hurdler holds against the wall: Kick up and hold the position for 5 seconds
  • Jump prep without the hurdler:
    • Straight jumps focusing on landing (3 sets of 5)
    • Tuck jumps for height (3 sets of 5)
  • Single-leg bounds for power (3 sets of 5 each leg)

Weeks 4-6: Introduction to the Jump

Week 4: Breaking Down the Prep

The prep is everything. After you count 5, 6, 7, 8, on the first 1, 2 bring your hands into a “clasp” right under your chin and hold them there for those two counts. On 3, 4, proceed to a “High-V” and hold that motion for those two counts.

Drill this until it’s automatic:

  • Prep practice: 50 reps of just the arm sequence
  • Add the knee bend on counts 3, 4
  • Practice the swing through without jumping
  • Mirror work: Athletes watch themselves to ensure chest stays high

Week 5: Adding the Jump

Start small:

  • Mini hurdlers: Jump just a few inches off the ground, focus on hitting the position
  • Use a prop: Have them jump and touch their knee to a coach’s hand held at appropriate height
  • Box jumps with hurdler position: Jump onto a small box (6-12 inches) landing in hurdler
  • Video review: Film each athlete and review together

Common issues at this stage:

  • Chest dropping (fix: “pretend there’s a string from your chest to the ceiling”)
  • Arms not hitting position (fix: practice arms separately 100 more times)
  • Bent leg not pulling up (fix: hamstring curls and targeted strength work)

Week 6: Height and Extension

Now we’re cooking:

  • Full jump attempts with focus on ONE aspect at a time:
    • Monday: Just focus on chest position
    • Tuesday: Just focus on straight leg height
    • Wednesday: Just focus on bent leg position
    • Thursday: Just focus on arms
    • Friday: Put it all together
  • Introduce combination work: Hurdler to immediate rebound

Weeks 7-9: Refinement Phase

Week 7: Technical Precision

Details matter in competitive cheer:

  • Toe point drills: Even in warm-ups, toes are pointed
  • Landing practice: Make sure to land properly with your feet together, toe to heel and with bent knees
  • Timing with music: Start incorporating counts and rhythm
  • Side-by-side comparisons: Athletes watch each other and provide feedback

Week 8: Power Development

Complete 6 to 8 reps of the hurdler with resistance bands while maintaining technique for maximal jump height and kick height:

  • Resistance band training (if appropriate for age/level)
  • Plyometric progressions:
    • Depth jumps from 6-inch box
    • Broad jumps focusing on explosive takeoff
    • Single-leg bounds with hurdler arms
  • Recovery focus: Teach proper stretching and foam rolling

Week 9: Consistency Building

The goal: 8 out of 10 perfect:

  • Set-based training: 5 sets of 3 jumps, rest between sets
  • Fatigue training: Hurdlers at the end of practice when tired
  • Pressure training: Perform for other teams or parents
  • Video analysis: Athletes self-assess using rubric

Weeks 10-12: Competition Ready

Week 10: Combinations and Connections

Real routines require connected skills:

  • Hurdler to toe touch combinations
  • Running tumbling into hurdler
  • Hurdler to immediate cradle prep (for younger teams)
  • Focus on maintaining height through fatigue

Week 11: Mental Preparation

The mental game is huge:

  • Visualization exercises: Athletes close eyes and see perfect hurdler
  • Positive self-talk training: Replace “I can’t” with “I’m learning”
  • Competition simulation: Full routine run-throughs
  • Individual goal setting: Each athlete sets personal best goals

Week 12: Polish and Peak

Time to shine:

  • Full routine integration
  • Focus on performance quality, not just technique
  • Team synchronization drills
  • Confidence building through success tracking
Need Competition Music Blue 1

Advanced Drills That Actually Make a Difference

Here are the drills I’ve collected over the years that really move the needle:

The Wall Series

Basic Wall Kicks:

  • Stand arm’s length from wall
  • 20 kicks straight up, trying to touch above head marker
  • Progress to faster tempo
  • Add ankle weights for advanced athletes (with caution)

Wall Hurdler Holds:

  • Back against wall
  • Jump and press back against wall in hurdler position
  • Hold for 3-5 seconds
  • Builds muscle memory and strength

Partner Drills

Assisted Hurdlers:

  • Partner holds athlete’s hands
  • Athlete jumps while partner provides slight upward assistance
  • Gradually reduce assistance
  • Great for building confidence

Resistance Partners:

  • Partners hold resistance bands attached to jumper’s waist
  • Provides resistance on the way up, assistance on the way down
  • Builds explosive power

Equipment-Based Progressions

Box Jump Variations:

  • Single leg box jumps (builds unilateral power)
  • Hurdler position box jumps
  • Depth jump to hurdler (advanced only)

Trampoline Work (if available):

  • Allows athletes to feel the position with more air time
  • Reduces impact during learning phase
  • Great for athletes afraid of the skill

Troubleshooting Common Problems

Let’s get real about the issues you’re going to see over and over:

Problem 1: The Dreaded Chest Drop

It’s important not to cut off the height of your jump by tilting your chest forward. This is THE most common issue.

Why it happens:

  • Lack of core strength
  • Trying to kick too high too soon
  • Poor spatial awareness

Fix it:

  • Wall sits with arms in touchdown (builds postural strength)
  • Video review from side angle
  • Verbal cue: “Show your number to the judges!”
  • Physical cue: Light tap on upper back during prep

Problem 2: The Lazy Back Leg

The tendency is to concentrate so hard on kicking your front leg, that you don’t realize that the back leg is still dangling around down there.

Why it happens:

  • All focus goes to the front leg
  • Lack of hamstring strength
  • Poor muscle activation patterns

Fix it:

  • Isolated back leg drills: Just practice the bent leg portion
  • Hamstring curls with resistance bands
  • Mental cue: “Kick your heel to your booty!”
  • Partner feedback: Have partner tap the heel when it’s in correct position

Problem 3: Sloppy Feet

Judges notice everything, and floppy feet scream “recreational team.”

Why it happens:

  • Never been properly trained
  • Lack of ankle strength
  • Poor habit formation

Fix it:

  • Releve walks across the floor
  • Theraband foot exercises
  • Point and flex drills during every water break
  • Make it non-negotiable: pointed toes from warm-up to cool-down

Problem 4: The Split Landing

Nothing ruins a beautiful hurdler like a sloppy landing.

Why it happens:

  • Uneven leg strength
  • Poor spatial awareness
  • Trying to land before ready

Fix it:

  • Landing drills separate from jumps
  • Single leg landing practice
  • Visual markers on the floor
  • Verbal cue: “Feet like magnets!”

Creating the Right Training Environment

Your gym’s culture makes or breaks skill development. Here’s how to optimize:

Space Considerations

Minimum requirements:

  • 8×8 feet per athlete for safe practice
  • Ceiling height of at least 12 feet
  • Spring floor or quality mats
  • Mirrors on at least one wall

Safety Protocols

Non-negotiables:

  • 10-minute dynamic warm-up (every. single. practice.)
  • Proper landing surface
  • Athlete-to-coach ratios (I recommend 8:1 maximum for jump training)
  • Clear progression requirements before moving to next level

Building Confidence

Remember: confidence builds skills as much as drills do.

Strategies that work:

  • Celebrate small wins publicly
  • Use positive correction: “I love your height! Now let’s add that toe point!”
  • Film progress videos monthly so athletes see improvement
  • Create skill-specific awards or recognition

Creating Buy-In From Athletes and Parents

Success requires everyone on board:

Athlete Buy-In

Make them partners:

  • Explain the “why” behind each drill
  • Let them track their own progress
  • Create peer mentorship opportunities
  • Connect skills to their goals

Parent Education

Informed parents = supportive parents:

  • Host a skills education night
  • Send home progress videos
  • Explain the progression timeline
  • Share the injury prevention focus

Final Thoughts: The Art and Science of Coaching

Teaching the hurdler jump is about so much more than just the mechanics. It’s about building confident, strong athletes who understand that excellence comes from consistent, focused effort. Every athlete will progress at their own pace, and that’s not just okay – it’s expected.

I’ve been fortunate to work with thousands of athletes over my years coaching, from tiny three-year-olds taking their first cheer class to Division 1 college competitors. The one constant? The athletes who master the fundamentals with patience and proper progression are the ones who excel long-term.

Remember, we’re not just teaching a jump. We’re teaching discipline, body awareness, goal setting, and the value of quality practice. These lessons extend far beyond the mat.

Your athletes don’t need to be perfect on day one, week one, or even month one. They need to be progressing, staying safe, and building confidence. Focus on the journey, not just the destination, and you’ll develop not just better cheerleaders, but better athletes and people.

Keep your energy high, your corrections positive, and your standards consistent. Before you know it, you’ll have a team throwing hurdlers that make the crowd go absolutely wild – and more importantly, you’ll have athletes who are proud of what they’ve accomplished through hard work and dedication.

Now get out there and start building those champion hurdlers! Your athletes are counting on you to guide them to success, and with this comprehensive approach, you’ve got everything you need to make it happen.

Stay passionate about the process,

P.S. – Remember to document the journey. Those “before” videos from week 1 compared to competition performances? Pure gold for showing athletes how far they’ve come. Plus, they make great material for end-of-year banquets!

Check out the conversation on our podcast “You Hit Zero”


Steve Pawlyk Signature Full

IPP's Premade Mixes are USA Cheer Compliant and customizable!  Add Sound FX, swap songs, & more!  Add your Team Name to the mix for only $10! 

SLAM artwork
Full_Out_130 mp3 image
1 minute cheer mix
WAKE UP THE FIRE
SLAM artwork
WAKE UP THE FIRE
Full_Out_130 mp3 image
1 minute cheer mix

Coach’s Guide to Daytona: Preparing for the 2025 NCA & NDA Collegiate Cheer and Dance Championship

Coachs Guide to Daytona Preparing for the 2025 NCA NDA Collegiate Cheer and Dance Championship

By Steve Pawlyk

Published February 25, 2025

Preparing for the NCA & NDA Collegiate Cheer and Dance Championship in Daytona Beach is a monumental task that requires strategic planning, rigorous training, and meticulous attention to detail. As a coach, your role is pivotal in guiding your team to success. Below are comprehensive strategies and insights to help you and your athletes excel at this prestigious event.


Understand the Championship Structure and Schedule

If you want your team to feel confident and prepared, now’s the time to get familiar with every detail of the competition setup. The more you know about the event’s layout, schedule, and performance logistics, the better you can plan ahead and avoid last-minute surprises.

1. Competition Venues
This event takes over multiple locations in Daytona, and each performance space has its own vibe, challenges, and logistical factors to consider. Here’s what you need to know about the two major venues:

  • 🏟 The Ocean Center (Indoor Venue)
    This is where Prelims and Finals for many divisions take place. It’s a fully enclosed arena, so lighting, acoustics, and crowd noise will feel different from an outdoor setting.
    The mat placement and spectator seating layout can impact how your routine is perceived, so try to review past performances in this space to see what works best.
    Expect strong air-conditioning—something to consider for warm-ups if your athletes are used to practicing in a warmer gym.
  • 🌊 The Daytona Beach Bandshell (Outdoor Venue)
    This is one of the most iconic performance stages in cheerleading, where top teams compete with the ocean as their backdrop.
    Weather plays a role here—humidity, wind, and bright sunlight can all impact your routine. Be prepared for adjustments!
    The sound carries differently outdoors, so your team should practice projecting their voices and energy more than they would in an enclosed space.
  • 💡 Pro Tip: If your team is competing in multiple locations, plan for extra transition time between venues. The walk from the Ocean Center to the Bandshell isn’t far, but moving a large group through the crowds can take longer than expected.

2. Stay on Top of the Event Schedule

  • Knowing when and where your team performs is just as important as perfecting the routine. Here’s what to do:
  • 📅 Check the Preliminary and Final Performance Orders Early
    The official schedule and performance order are usually released closer to the event date. Keep checking the NCA & NDA website (Varsity.com) and your coach’s email for updates.
  • Double-check call times and warm-up slots so you can create a competition-day timeline that keeps your team on track.
  • Build in Extra Time for Everything
    Between staging areas, warm-up zones, and travel time, things always take longer than expected.
    Account for extra minutes when moving between practice areas and performance spaces to avoid rushing or missing a crucial warm-up moment.
  • 📢 Know the Awards Schedule
    Awards ceremonies can feel chaotic if you don’t know where to go and when.
    If your team is competing in multiple divisions, make sure you know which award announcements they need to be present for so nobody misses their moment on stage.
Need Competition Music Blue 1

3. Monitor Official Updates

  • 🏆 Follow the NCA & NDA Website & Socials
  • Schedules can change, and last-minute updates about weather, venue shifts, or rule clarifications might be posted online.
  • Follow Varsity and NCA & NDA on social media for real-time updates—especially if you’re competing at the Bandshell where weather can be unpredictable.
  • 📱 Set Up a Team Communication System
  •  Use a group chat or app like BAND or GroupMe to instantly relay any changes to your team, parents, and staff.
  • If your schedule changes, make sure everyone knows where to be and when—especially for warm-ups and performance times.

2. Make Small Tweaks to Maximize Crowd Engagement

Daytona is coming up fast, there’s no time for massive overhauls—but small, strategic changes can make a huge difference in how the crowd reacts to your routine. Here are some last-minute adjustments that can take your performance from great to unforgettable:

1. Play to the Crowd—Literally

  • Find moments in your routine where your team can make eye contact, point, or interact with the audience. Even a well-placed smirk, wink, or fist pump can make the crowd feel like they’re part of the performance.
  • If you’ve got a signature chant, dial it up—encourage teammates on the sidelines to echo key words, making it feel bigger and more powerful.

2. Add a Quick Hit of Showmanship

  • Fight song-style moments—where the whole team claps or motions together—can amplify energy without changing choreography.
  • If your routine has a quick pause, try adding a synchronized head snap, chest pop, or pose to emphasize the moment and give the audience a second to react.
  • Use facials intentionally—a well-timed “WOW” face after a big trick makes it look even more impressive.

3. Adjust Your Formation for Maximum Impact

  • If your pyramid or dance section looks a little flat, consider tightening the spacing slightly so the effect reads bigger from the audience’s perspective.
  • Keep front-facing athletes aware of where the cameras are so your routine translates well for livestream and judges’ views.

4. Pump Up the Sideline Energy

  • Even when they’re not performing, your non-competing athletes should stay animated, clap, and react to big moments. This keeps the energy up and helps influence the crowd to get involved.
  • Assign a few teammates to lead claps, call out hype words, or react to big stunts to keep the momentum building.

5. Test a Crowd Cue

  • If you have a moment in your routine where the crowd could shout something back, start practicing it now! Even a simple “LET’S GO!” or “HEY!” at the right time can turn the crowd into part of the show.
  • Have the team practice performing with full-out energy, imagining the crowd roaring behind them. The more confident they are in getting a response, the better it will land.

6. Fine-Tune Your Music Timing

  • Double-check that key beats in your music align with power moves, transitions, and final poses to get maximum audience reaction.
  • If there’s a hype section, make sure athletes emphasize their movements there—even an extra arm snap or high-energy bounce can make a difference.

It’s About the Feeling

At this stage, it’s not about perfecting every single motion—it’s about maximizing connection with the crowd and judges. The more engaged and excited your team is, the more the audience will feed off their energy. Make small tweaks like these, and you’ll turn heads 🔥🏆

3. Scout and Learn from Top Competitors

Looking back at previous NCA & NDA Collegiate Cheer and Dance Championships can really help you understand the competition and see the high standards top teams set. By studying what these programs have achieved, you can find inspiration and set benchmarks for your own team’s preparation.

Notable Champions from Recent Years:

  • University of Louisville All-Girl Cheer Squad: Demonstrating consistent excellence, the University of Louisville’s All-Girl Cheer Squad secured their tenth consecutive national championship in 2024, edging out competitors by a margin of just over 0.02 points. Go Cards
  • Weber State University: In 2023, Weber State University clinched the Large Coed Grand National Championship with an impressive score of 98.0833, showcasing their superior skills and synchronization.
    Cheer Updates
  • Brigham Young University (BYU) Cougarettes: BYU’s dance team, known as the Cougarettes, has a storied history of success, amassing 26 national championships as of 2024. Their dominance spans multiple categories, including Jazz and Hip Hop divisions.
    Wikipedia
  • Navarro College: Under the guidance of coach Monica Aldama, Navarro College’s cheerleading team has achieved remarkable success, securing 16 NCA National Championships in the Advanced Large Coed division since 2000.
    Wikipedia
  • Davenport University: Davenport’s cheerleading program has demonstrated consistent excellence, winning multiple NCA National Championships across various divisions, including titles in 2013, 2014, 2015, 2016, and 2017.
    Wikipedia

4. Plan Logistically for a Smooth Experience

The last thing you want is avoidable stress throwing off your team’s rhythm. A little extra planning on the logistics side can keep everyone calm, focused, and ready to perform at their best. Here’s how to tighten things up in the final stretch.

1. Lock in Your Travel Game Plan

You probably already have flights, buses, or carpool plans set in stone, but now’s the time to double-check everything:
Confirm departure times and ensure everyone knows when and where to meet. If you’re flying, remind the team about baggage policies (nobody wants to be THAT person holding up security).
Have a backup plan—delays happen, so make sure you have a cushion in your schedule, especially if you’re flying into Orlando and driving to Daytona.
Keep the team fueled and hydrated—if you have long travel days, pack easy-to-eat snacks (protein bars, fruit, and electrolyte drinks are lifesavers).

2. Make Sure Your Hotel Setup Works for Your Team

Your hotel is more than just a place to sleep—it’s your team’s home base for the competition, so a few small tweaks can make the experience smoother:
🏨 Room Assignments Matter—Pair athletes strategically so they actually get some rest (avoid the “up-till-3 AM giggling” combo).
🏨 Stock Up on Essentials—Plan a quick grocery run for bottled water, light snacks, and whatever small things keep your team comfortable.
🏨 Transportation to the Venue—If you’re not within walking distance, figure out the best way to get to the competition site ahead of time. Delays from waiting on Ubers or traffic can throw off your timeline.

3. Plan Out Your Practice & Warm-Up Time in Daytona

The competition floor feels totally different from your home gym, so the more familiar your team gets with it, the better they’ll perform. Here’s how to maximize your practice time:
📅 Know your assigned practice slot—Check and re-check the schedule so you don’t miss your chance to run full-outs before hitting the mat.
📅 Scout nearby practice spaces—Not all teams will get as much official warm-up time as they’d like, so some coaches arrange for off-site practices at local gyms, hotel ballrooms, or even open spaces on the beach.
📅 Simulate the performance environment—Have your team practice with full-out energy, facials, and crowd engagement just like they’ll need to on competition day.

4. Keep the Team Organized & Stress-Free

The more structure and predictability you provide, the less stress your athletes will feel:
Create a daily itinerary—Lay out everything from wake-up times to practice sessions to meal breaks, so nobody has to guess what’s next.
Pack smart—Encourage athletes to do a “full-dress rehearsal” at home so they don’t forget anything (nothing worse than realizing you left your cheer shoes behind).
Assign roles—Designate someone to handle last-minute runs for forgotten items and another person to keep everyone on schedule during competition day.

5. Encourage Community and Family Involvement

Building a support network enhances the experience:

  • Communication: Keep families informed about schedules, expectations, and ways they can support the team.
  • Appreciation Events: Host gatherings to thank supporters and build a sense of community around your program.

By implementing these strategies, you can lead your team to a successful and enriching experience at the NCA & NDA Collegiate Cheer and Dance Championship. Remember, thorough preparation, adaptability, and a positive mindset are key components of competitive excellence.

By examining the routines, training methods, and performance strategies of top programs, you can gain valuable insights. Incorporating innovative choreography, rigorous conditioning, and fostering team unity can elevate your team’s performance. Understanding the judging criteria and tailoring successful techniques to your team’s strengths can also give you a competitive edge. Learning from these successful programs allows you to refine your coaching strategies and better prepare your team for the challenges of the NCA & NDA Collegiate Cheer and Dance Championship.

Steve Pawlyk Signature Full

IPP's Premade Mixes are USA Cheer Compliant and customizable!  Add Sound FX, swap songs, & more!  Add your Team Name to the mix for only $10! 

SLAM artwork
Full_Out_130 mp3 image
1 minute cheer mix
WAKE UP THE FIRE
SLAM artwork
WAKE UP THE FIRE
Full_Out_130 mp3 image
1 minute cheer mix

Preparing Your Team for End-of-Season Cheer Events: A Coach’s Guide

Preparing Your Team for End of Season Cheer Events A Coachs Guide

By Steve Pawlyk

Published September 3, 2024

As the cheerleading season progresses, the stakes get higher, and the competition gets tougher. The end-of-season events, such as the Allstar World Championship and the ICU World Championship, are some of the most prestigious competitions in the cheerleading world. For coaches, preparing a team to excel in these events requires meticulous planning, intense training, and a strong mental game. Here’s how you can ensure your team is ready to shine when it matters most.

1. Start with a Strong Foundation

  • Refine Basic Skills: Before delving into complex routines, make sure your team has mastered the basics. Stunts, tumbling, and jumps should be flawless and consistent. This foundation is crucial for building more intricate performances.
  • Conditioning and Strength Training: Incorporate regular conditioning sessions focused on building the strength and endurance needed for high-energy performances. This includes exercises that target core stability, flexibility, and explosive power.

2. Crafting the Perfect Routine

  • Routine Composition: Create a routine that highlights your team’s strengths while adhering to the scoring criteria of the competition. Balance difficulty with execution to avoid deductions. Consider consulting with choreographers who specialize in end-of-season competitions to gain an edge.
  • Incorporate Unique Elements: To stand out, incorporate creative elements such as unique transitions, visual effects, or unexpected musical choices. Judges often appreciate originality, provided it doesn’t compromise the routine’s execution.

3. Mental Preparation

* Visualization Techniques: Encourage athletes to use visualization techniques, imagining themselves successfully performing the routine. This mental rehearsal can boost confidence and reduce anxiety.
* Focus on Team Cohesion: Building a strong sense of unity and trust within the team is crucial. Team-building activities, group discussions, and positive reinforcement can help foster a supportive environment, essential for high-pressure situations.

4. Simulate Competition Conditions

* Mock Competitions: Hold full-out performances under conditions that simulate the actual competition environment. This includes performing in front of an audience, adhering to strict time limits, and dealing with potential distractions.
* Video Analysis: Record these performances and review them with the team. Highlight both the strengths and areas that need improvement. Use this feedback loop to make necessary adjustments and refine the routine further.

Need Competition Music Blue 1

5. Focus on Recovery and Injury Prevention
* Injury Prevention: As training intensity ramps up, so does the risk of injury. Ensure that athletes are following proper warm-up and cool-down protocols. Regularly check in with athletes about any aches or pains and address them promptly.
* Rest and Recovery: Plan for adequate rest days and recovery sessions. Overtraining can lead to burnout and diminish performance. Incorporate activities like yoga, stretching, and massage therapy to aid in recovery.
6. Fine-Tuning and Final Adjustments
* Routine Adjustments: As the competition approaches, make any final tweaks to the routine based on feedback and performance. Focus on cleaning up the details—pointed toes, sharp motions, and synchronized timing.
* Mental Rehearsals: In the final days before the competition, reduce physical training and focus on mental rehearsals. Use this time to build confidence and ensure that each athlete knows their role inside and out.
7. Prepare for the Event Day
* Event Logistics: Ensure that all logistics, from travel arrangements to uniform checks, are in order well in advance. Reducing stress on event day allows the team to focus solely on their performance.
* Nutrition and Hydration: Educate athletes on the importance of proper nutrition and hydration leading up to the event. A well-fueled body is essential for peak performance.

8. During the Competition
* Stay Calm and Focused: As a coach, your demeanor sets the tone for the team. Stay calm, offer constructive feedback, and keep the team focused on their goals.
* Post-Performance Reflection: After the performance, regardless of the outcome, gather the team for a reflection session. Highlight what went well and what can be improved for future performances. Use this as a learning experience for all athletes.

Preparing for end-of-season cheerleading events requires more than just skill; it requires strategy, mental toughness, and a well-rounded approach to training. By focusing on these key areas, you can help your team not only compete but excel on the biggest stages in cheerleading. Remember, the journey to these events is as important as the performance itself—every practice, every drill, and every moment of preparation contributes to the final outcome.

Steve Pawlyk Signature Full

IPP's Premade Mixes are USA Cheer Compliant and customizable!  Add Sound FX, swap songs, & more!  Add your Team Name to the mix for only $10! 

SLAM artwork
Full_Out_130 mp3 image
1 minute cheer mix
WAKE UP THE FIRE
SLAM artwork
WAKE UP THE FIRE
Full_Out_130 mp3 image
1 minute cheer mix

How to Deal with Difficult Parents: A Coach’s Guide

how-to-deal-with-difficult-parents-cheerleading-coaching

By Steve Pawlyk

Published September 21, 2023

Coaches often have to juggle more than just routines, athletes, and competitions. One of the most challenging aspects can be dealing with difficult parents. Whether they’re over-involved, overly critical, or simply not supportive, difficult parents can create stress and obstacles for any cheer coach. In this comprehensive guide, we’ll explore effective strategies for managing and improving your relationship with challenging parents, ensuring a smoother and more fulfilling coaching experience for everyone involved.

Understanding the Types of Difficult Parents

Before tackling the issue, it’s essential to understand the different types of difficult parents you might encounter.


The Overzealous Parent

The Overzealous Parent is a fixture at cheerleading practices, events, and even social gatherings related to the team. They are highly invested in their child’s cheer career, sometimes to the point where it seems like they’re reliving their own athletic aspirations through their kids. This type of parent is often well-meaning but can become a distraction or even a source of stress for you or your athletes. They might scrutinize your coaching techniques, question your decisions, and even offer unsolicited advice on how to run practices or routines.

Potential Issues

  • Micromanagement: Overzealous parents may try to dictate how practices should be conducted or criticize your coaching methods.
  • Undermining Authority: Their constant presence and vocal opinions can undermine your authority as a coach, causing confusion among the athletes.
  • Creating Unnecessary Pressure: Their high expectations can translate into undue pressure on their child and, by extension, the whole team.

How to Deal with the Overzealous Parent

Handling an Overzealous Parent requires a delicate balance of assertiveness, diplomacy, and professionalism. Here’s how:

1. Set Clear Boundaries Early On

During your initial parent meeting, make it clear what your role is as a coach and what you expect from parents. You might say something like, “While we appreciate your enthusiasm and support, it’s crucial to remember that during practices and events, I am responsible for coaching the athletes.”


2. Maintain Professionalism

Always maintain a professional demeanor when interacting with these parents. If they offer unsolicited advice during a practice, politely thank them for their input and say, “I appreciate your perspective. I have a specific plan for the team, and it’s important that we stick to it to ensure everyone’s success.”

3. Private Conversations

If the parent continues to overstep, consider pulling them aside for a private conversation. Be honest but tactful, explaining that while you appreciate their interest and passion, their behavior is becoming disruptive. You might say, “I understand you have your child’s best interest at heart, but it’s important for me to be able to coach the team without outside interference.”

4. Enforce Rules Consistently

If the behavior continues, you may need to enforce stricter boundaries, like limiting parental observation during practices or asking them to refrain from approaching you during practice hours.

5. Seek Support from Program Administration

In extreme cases, it may be necessary to involve higher-ups like the athletic director or program coordinator. Having a neutral third party can sometimes help mediate the situation and bring about a resolution.

While the Overzealous Parent may pose challenges, remember that their passion comes from a place of wanting the best for their child. By setting clear boundaries, maintaining professionalism, and fostering open communication, you can turn this potentially difficult relationship into a more manageable, and even constructive, one.

 
Need Competition Music Blue 1

The Critic

The Critic is a type of parent who seems to find fault in almost everything—from your coaching methods to the team’s performance, and sometimes even the cheerleading program as a whole. While criticism can sometimes be constructive, these parents often present their opinions in a way that can be demoralizing or disruptive. They might openly question your decisions, compare your coaching unfavorably to others, or make their criticisms known to other parents or even the athletes themselves.

Potential Issues

  • Eroding Confidence: The constant criticism can undermine your authority and erode the confidence of both you and your athletes.
  • Disrupting Team Dynamics: If not managed carefully, their negative comments can create a toxic environment, affecting the team’s morale and cohesiveness.
  • Miscommunication: Critics often base their judgments on their own perceptions, which might be uninformed or biased, leading to misunderstandings and conflicts.

How to Deal with The Critic

Managing a parent who is a Critic requires a thick skin, diplomacy, and a focus on constructive dialogue. Here’s how:

1. Don’t Take It Personally

The first step in dealing with a Critic is to understand that the criticism is often not about you. It may stem from the parent’s own insecurities, past experiences, or high expectations for their child. Take their comments as feedback, not as an attack on your competence.

2. Acknowledge and Redirect

When faced with criticism, acknowledge the parent’s concerns without agreeing or disagreeing. You might say, “I understand you have concerns about [specific issue]. I’m committed to doing what’s best for all the athletes on the team.”

3. Keep the Focus on the Athletes

Remind the parent that your primary concern is the development and well-being of all the athletes on the team. Emphasize that you have a strategy and plan in place aimed at achieving this.

4. Seek to Understand

Sometimes criticism arises from misunderstandings or lack of information. Ask the parent to elaborate on their concerns and provide your perspective to clear up any misconceptions.

5. Set Boundaries for Feedback

Establish a formal channel and appropriate times for parents to provide feedback, like scheduled meetings or designated office hours. This helps prevent disruptive confrontations during practices or events.

6. Consult with Other Coaches or Administration

If the criticism becomes excessive or starts affecting your ability to coach, it may be helpful to consult with other coaches or higher-ups in your program. They can offer additional perspectives and may even mediate if necessary.

In Summary

While dealing with a Critic can be challenging, it’s important to remember that their criticisms often come from a place of wanting their child to succeed. By maintaining professionalism, acknowledging their concerns, and setting appropriate boundaries, you can manage these difficult interactions more effectively. Ultimately, open communication and a focus on the athletes’ well-being can often diffuse tension and lead to a more constructive relationship with even the most critical of parents.


The Uninvolved Parent

The Uninvolved Parent is generally passive in their approach to their child’s cheerleading journey. They fulfill the basic responsibilities like paying for classes and providing transportation to events, but their engagement usually stops there. They are rarely seen at practices, seldom volunteer for team activities, and may not show much interest in the team’s progress or their child’s development in the sport.

Potential Issues

  • Lack of Support: The absence of parental involvement can sometimes translate into a lack of emotional or moral support for the athlete.
  • Missed Opportunities: These parents are often unaware of the full range of experiences and benefits that active involvement in cheerleading can offer to both them and their children.
  • Limited Communication: Their limited involvement can make it difficult to keep them informed about important updates, leading to misunderstandings or missed commitments.

How to Deal with The Uninvolved Parent

Engaging an Uninvolved Parent can be a subtle art that requires persistence, tact, and a focus on highlighting the positive impacts of greater involvement. Here’s how:

1. Open Channels of Communication

Take the initiative to keep these parents informed. Regularly send out newsletters or updates that highlight not just team achievements but also individual accomplishments, including those of their child.

2. Personalize the Engagement

Whenever possible, provide personalized updates on their child’s progress. This could be through periodic one-on-one meetings or even simple notes that point out improvements, milestones reached, or commendable efforts during practices or competitions.

3. Offer Inclusive Opportunities

Create opportunities for all parents to be part of the team’s activities, even if in small ways. This could be as simple as inviting them to a team celebration or asking for volunteers for less demanding tasks.

4. Highlight the Benefits

Sometimes parents are uninvolved because they are unaware of the benefits of active participation. Make it a point to share stories or testimonials from other parents who have found great value in becoming more involved in their child’s cheerleading experience.

5. Be Patient and Consistent

Change rarely happens overnight. Continue your efforts to involve them and recognize any steps, however small, they take toward becoming more engaged.

6. Assess and Adapt

Keep track of your engagement efforts and their outcomes. If you find that certain strategies are more effective than others, adapt your approach accordingly.

In Summary

While it may be challenging to engage an Uninvolved Parent, it’s worth the effort for the sake of the athlete and the team as a whole. Through consistent communication, personalized engagement, and a bit of patience, you can help them become more active participants in their child’s cheerleading journey. In doing so, you not only enhance the experience for their child but also contribute to a more cohesive and supportive team environment.

Dealing with difficult parents is a challenge that almost every cheer coach will face at some point. By understanding the types of difficult parents, setting boundaries, communicating effectively, and employing conflict resolution strategies, you can create a more harmonious and successful cheerleading program.


Steve Pawlyk Signature Full

IPP's Premade Mixes are USA Cheer Compliant and customizable!  Add Sound FX, swap songs, & more!  Add your Team Name to the mix for only $10! 

SLAM artwork
Full_Out_130 mp3 image
1 minute cheer mix
WAKE UP THE FIRE
SLAM artwork
WAKE UP THE FIRE
Full_Out_130 mp3 image
1 minute cheer mix

Essential Tips and Rules for First-Year British Cheer Coaches

Essential Tips and Rules for First-Year British Cheer Coaches

By Steve Pawlyk

Published June 23, 2023

Cheerleading is an art and sport that fosters unity, promotes physical fitness, and instils a sense of leadership among participants. If you’re a first-year coach of a British cheer team, you might find the role challenging yet rewarding. This blog post is your handy guide, brimming with advice, tips, and insights into the rules specific to cheerleading in the United Kingdom

1. Understanding the Basics of Cheerleading

The first tip, which may sound obvious but is worth emphasizing, is understanding the basics of cheerleading. It’s not all about pom-poms and high-energy chants. Cheerleading in the UK, like any other sport, demands discipline, teamwork, athleticism, and creativity. The British Cheerleading Association (BCA) provides an excellent resource for coaches and athletes alike to understand the rules and basics of cheerleading.

2.Ensuring Athlete Safety

The safety of your athletes should always be your top priority. Always ensure they are properly warmed up before practice and cool down afterwards. Ensure your team learns and perfects basic cheerleading skills before moving on to more complex stunts. Know the regulations regarding the mats and other equipment, which need to be compliant with BCA and UKCA (United Kingdom Cheerleading Association) rules.

3. Encourage and Motivate

Your team’s morale will play a significant role in their performance. As a coach, it’s your responsibility to keep the team motivated. Recognize each team member’s strengths and build on them. Constructive criticism is a great tool, but make sure it’s balanced with praise and encouragement.

4. Teaching Teamwork

Cheerleading is all about teamwork. Facilitate exercises that foster trust, cooperation, and communication among your team members. Remember, a successful stunt isn’t just about athleticism—it’s about impeccable timing and unyielding trust in each other.

5. Understanding Cheer Rules Specific to the UK

In the UK, cheerleading is governed by organizations such as BCA and UKCA, which enforce rules to ensure the sport is safe and enjoyable. Familiarise yourself with their guidelines, especially if your team participates in competitions.
   – Age Groups: The BCA outlines specific age groups for cheerleading teams: Peewee (6 and under), Mini (8 and under), Youth (11 and under), Junior (14 and under), and Senior (10 and above). Ensure your team members fit within the correct age bracket.
   – Team Sizes: Depending on the competition category, team sizes may vary from one (for individual categories) to 36 athletes.
   – Routine Duration: For most categories, routines should be a maximum of 2 minutes and 30 seconds.
   – Music: If you use music in your routine, it must be licensed for use. The BCA and UKCA have strict rules on music copyright.
   – Costumes: Costumes should be modest, tasteful, and provide enough coverage. They must also allow for the safe execution of cheerleading moves.
   – Stunts and Tumbling: Certain stunts and tumbling moves are prohibited in specific age categories for safety reasons. Always check the latest BCA or UKCA rules before incorporating a new move into your routine.

As Vince Lombardi once said, “”Coaches who can outline plays on a blackboard are a dime a dozen. The ones who win get inside their player’s heads.” Embrace this philosophy, and you’re already halfway to success.

6. Continuous Learning

As a first-year coach, never shy away from learning opportunities. Attend coaching seminars, engage with experienced cheer coaches, and stay updated with the latest cheerleading trends and techniques. Both the BCA and UKCA regularly offer training and educational resources to help you become a more effective coach.

7. Focusing on Fitness

Cheerleading is a physically demanding sport, and thus it’s critical for your athletes to maintain a high level of fitness. Focus on strength, flexibility, and endurance training. Regular conditioning can help prevent injuries and improve performance.

8. Managing Time

Managing your time and your team’s time effectively is crucial. Your practice sessions should be structured and efficient, with a clear goal in mind. Be punctual, respect your athletes’ time, and encourage them to do the same.

9. Ethical Considerations

As a cheer coach, you play a vital role in shaping young athletes’ attitudes and behaviours. It’s important to exhibit ethical behaviour both on and off the cheer mat. This includes fair play, respect for all team members, and a strong commitment to the team’s success.

10. Building a Community

Finally, fostering a sense of community can help your team achieve greater success. Encourage parents to get involved, reach out to local businesses for sponsorship, and participate in community events. A supportive community can greatly enhance your team’s morale and provide necessary resources.
Being a first-year British cheer coach might be challenging, but it’s also an opportunity to inspire young athletes, create memorable experiences, and instill lifelong values. Keep the above advice and rules in mind, and remember, the key is not to strive for perfection but progress. You’re embarking on a journey filled with cheers, challenges, and triumphs – embrace it wholeheartedly!
In conclusion, your journey as a first-year British cheer coach will undoubtedly be a learning curve. Remember, every experienced coach was once a beginner, and with dedication, persistence, and a positive mindset, you’ll be leading your team to new heights. Stick to the rules, prioritize safety, foster an environment of mutual respect, and above all, don’t forget to have fun!
May your first year of coaching be the beginning of a rewarding journey filled with cheers, passion, and unparalleled success. Now, get out there and let your cheer spirit shine!

Steve Pawlyk Signature Full

The Do’s and Don’ts of the 8-Count Sheet

Do and Donts of 8 count sheet ipp blog yhz 2100x_

By Steve Pawlyk

Published July 8, 2019

THE DO'S and DONT'S OF THE 8-COUNT SHEET

Someone out there needs to hear this…

your 8-count sheets are a mess

There I said it!  Don’t be mad. I’m just playing with you!  I know that filling out an 8-count sheet can be confusing and tedious at times.  Who wants to sit there and fill in each of those little boxes count by count – line by line.  It can make you pull your hair out. I know that’s why so many coaches fly through it just to get it done.  I’m right there with you. I have been guilty of this at times too. However, it can be problematic since the 8-count sheet can be a critical part of your music creation.  Most of the time it’s all your producer has at their disposal. Therefore, if your 8-count sheet is unclear or confusing then your music producer may not be able to execute that perfect mix that you envision.  Let me help you to solve this problem by providing examples of the do’s and don’ts of the 8-count sheet.

So why is this important?

Plain and simple, having the perfect 8-count sheet will reduce any aggravation on the part of you and your producer.  Your mix is the heartbeat of your routine. The perfect mix can help to bring your routine to life and pump up your team.  When you submit your count sheet at the beginning of the season you envision receiving a mix so perfect that the crowd wants to know all the lyrics and wants to sing along at competition like they do for Cheer Extreme Senior Elite and Top Gun.  Having the crowd support can help to lift your team up to the next level during their performance. You want your sound effects to be big and expressive, your beats to hit hard and the lyrics to be perfect! Trust me, your producer wants this for you as well.

Hopefully, I still have your attention. Now let’s dive in and see how both you and your producer can collaborate to create the most magnificent piece of routine music that you’ve ever heard!

Do:

Use the recommended count sheet that your producer prefers.   Most production companies create and only like to work off of their own count sheet as they know it well.

Dont:

Please don’t make up your own count sheet.  I’ve seen this time and time again. Some coaches have submitted pictures of their routine sketched out on a napkin with hand drawn rows and columns

Do:

Record your routine to an 8-count track.  You will want to have an accurate reference when filling out your 8-count sheet. Using an app like Simple8 by IPP is great way to record and save your videos!

Dont:

Avoid trying to fill out your 8-count sheet by memory or in real-time (while watching your team practice).  This will lead to an error 100% of the time.

BROWSE PREMADE MIXES
IPP Logo BG sml w frame

Do:

Make sure to include to the intro line when filling out your 8-count sheet.

Your producer’s count sheet should always start on 1.1 as the introduction line.  You will typically see that some producers will black out counts 1-4 (to start on 1.5) as a reminder that this is, in fact, is your opening 5,6,7 & 8

Regardless, if the first 8-count has any indication whether or not you should always start your first action on 2.1

For example, if your first section is standing tumbling then your section label would be placed on 2.1 and your actions would start somewhere on this line.  The reason for this is that your producer’s mixing software starts on 1.1 (with 1.5 being your usually 5,6,7 &8 intro). Therefore, 2.1 is the first line where he/she can start your mix.

Basically, what you consider the first 8-count of your mix is the second 8-count to your producer.

Basically, what you consider the first 8-count of your mix is the second 8-count to your producer.

Dont:

Avoid skipping the intro line.  This will cause your entire mix to be off by one full 8-count leading to an edit (i.e., Reconstruction ) to be made necessary.  This may be time consuming and costly.

Do:

Note your sections on either the left/right side of the count sheet. This allows your producers to quickly understand the flow of your routine and helps to map out ideas.

Dont:

Make sure not to leave your sections blank. This can cause unnecessary guess work on the part of your producer and the mix can start to lose it’s cohesiveness.

Do:

Include your song choices on either side of the count sheet, at the bottom in the notes, on the cover page of the count sheet (where applicable) or in an email (noting which song goes with which section of the routine).

Dont:

Never leave your mix without song selections. Producers generally dislike picking songs. It can be a long process trying to find songs that they think you might like in your mix.  This leaves less time for actual mix creations. Additionally, your producer may pick something that you don’t like leading to edit which can incur a fee.

Do:

When adding action words (sound effects) to your count sheet be sure to be clear and concise.  Try to use one or two words per box to describe your actions. For example, scale, twist, double full and etc.  In addition, only use action words that are pertinent to your routine. Remember, sound effects are unique audio samples used to highlight important actions in your routine, therefore, we suggest only including sound effects that help to bring your routine to life.  If you need to add extra information about your routine as a whole or a certain section then you can provide that information at the bottom of the 8-count sheet in the “notes” section.

Good Count Sheet:

Dont:

Avoid filing each box with phrases or multiple actions. Although you think it may be helpful – it’s not. It can become hard to decipher sometimes.  Also, producers can only add one sound effects per beat in your mix so if you put multiple action words in the box it could make your mix sound like a mess.  Only include the most important action words on your 8-count sheet. Additionally, not every box needs to be filled with minor details or actions such as set, look, hold and etc.  Your producer prefers to see a clean 8-count sheet verses one cluttered with a million words. It will help to expedite the process. Trust me!

Bad Count Sheet:

Do:

Make sure that you mix starts and ends at the correct time to avoid edits and/or your mix going over the allotted time requirements. As mentioned before, your mix will need an intro.  Typically, you’ll want to start on 1.1 or 1.5. However, there can be some slight variation (e.g., 1.3 or 1.7). Just as important as making sure that your mix starts on the correct count is that it ends on the correct count.  This will avoid your mix going over time which will eliminate the chance of receiving a time violation penalty at competition. We recommend that your mix ends on the following counts to meet the different mix length time limits: 47.1 for a 2:30 mix, 42.1 for a 2:15 mix, 37.1 for a 2:00 mix and 28.1 for a 1:30 mix.  These recommendations are based on a 146 beats-per-minute (bpm) mix speed.

Dont:

Please do not go over time! This can be a hassle for both of us. Mixes that end past the recommended stop times will need to be sped up. What typically happens in these cases is that the mix becomes too fast leading to poor execution of skills. However, there are some more advanced teams that can handle this speed increase. Others can’t. Those teams that can’t handle the speed increase will come back with a Reconstruction Request (link out to p&p definition of a reconstruction in the edits section) which will require the removal of a specified amount of 8-counts. An edit of this nature will usually incur a fee – yikes!

Do:

Keep your producer’s 8-count sheet as intended.  It has been formatted the way he or she likes. If there are any special instructions then your producer will let you know ahead of time.

Dont:

Refrain from modifying your producer’s 8-count sheet.  Doing something to the count sheet unannounced may result in a mistake in production.  For example, avoid color-coding your sections. This can be distracting. Just list sections on the side as mentioned above.  The only time highlighting will be necessary is when re-submitting your 8-count sheet for an edit

I know some of this can seem confusing, but it’s really not.  We are here to help you every step of the way. If you have any questions please contact us.  We want to make your music experience as pleasant as possible. Regardless if you use IPP or not, we are willing to assist you at any point in the season.

Steve Pawlyk Signature Full

SHARE YOUR CART