Tag Archives: Cheerleading Exercises

Regaining Your Flexibility for Cheer

Regaining Your Flexibility for Cheer A Comprehensive Guide

By Steve Pawlyk

Published November 14, 2023

Many athletes find themselves in a common predicament—regaining lost flexibility. Flexibility is a cornerstone of cheerleading, essential for executing stunts, tumbling, and jumps with grace and precision. In this guide, we delve into targeted stretches and strategies to enhance your flexibility, focusing on hips and arms, ensuring you’re tryout-ready by March.

flexibility training

Understanding Flexibility in Cheerleading:

Flexibility in cheerleading is multifaceted; it encompasses more than the ability to stretch muscles. It’s about achieving optimal mobility—where muscles and joints work in unison to allow for complete, fluid movements that are essential in cheer routines.

Additionally, flexibility is deeply intertwined with strength; it’s not enough to merely be able to reach a position. A cheerleader must have the muscular strength to hold that position, perform it with control, and transition in and out of it with precision.

A high V or a heel stretch, for instance, isn’t solely about the ability to lift the leg high but also about the control and stability in the supporting leg, the strength in the core to maintain posture, and the arm strength to hold the pose. Similarly, when maintaining balance in scales and arabesques, a cheerleader must engage multiple muscle groups simultaneously, ensuring that each movement is as deliberate as it is graceful.

The integration of flexibility and strength is what allows cheerleaders to perform with the athleticism and artistry that the sport demands. To achieve this, cheerleaders must focus on a holistic flexibility routine that not only increases the range of motion but also builds the strength and control needed to execute complex cheer movements effectively and safely.

Tailored Stretching Regimen:

To regain your flexibility, a structured routine is pivotal, one that progressively enhances your capacity for cheer-specific movements. Here’s a closer look at the essential stretches:

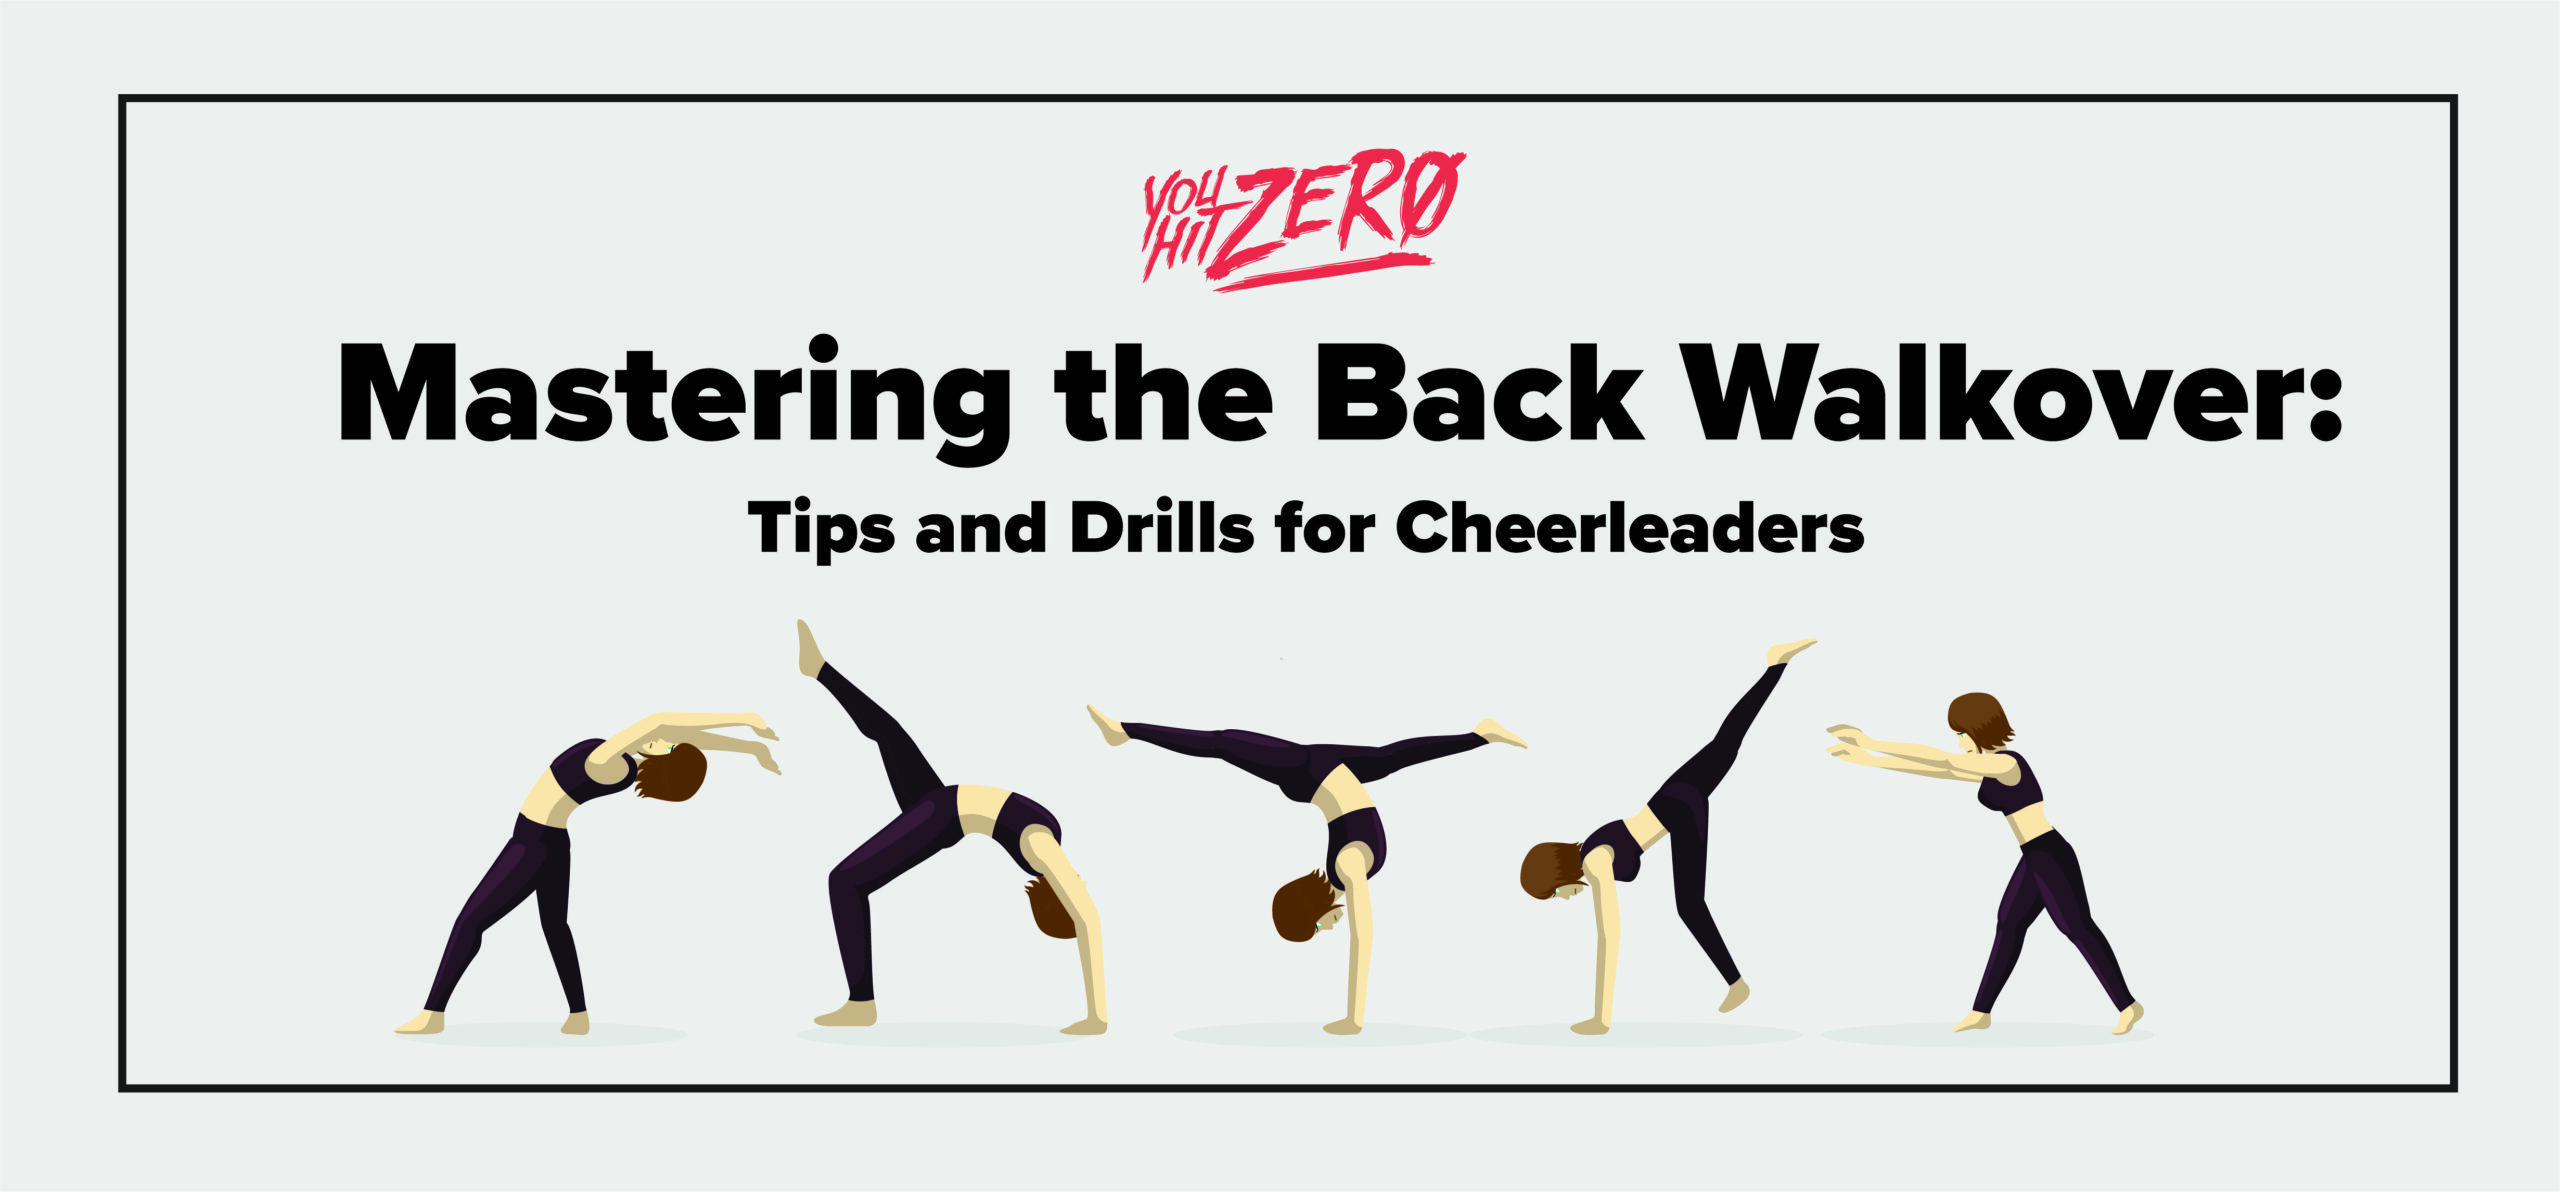
Bridges: An exemplary stretch for cheerleaders, bridges target spinal flexibility, which is a fundamental aspect of tumbling and performing backbends. When you practice bridges, you’re not only increasing the flexibility of your spine but also strengthening your back muscles. This dual benefit is crucial because a strong back enables you to safely perform a wide array of cheer motions, from back walkovers to layouts, reducing the risk of injury.

Splits (Front and Middle): Splits are a definitive stretch that test and improve the elasticity of your hip flexors, hamstrings, and adductors. Consistently practicing both front and middle splits ensures that you develop flexibility evenly on both sides of your body, which is essential for symmetry in cheerleading skills. This symmetry is important not just aesthetically but also functionally, as it allows for balanced force distribution during jumps and while performing stunts.

Pancake Stretch: A pancake stretch is an intensive stretch that has you sit on the ground with your legs spread wide and fold your torso forward. This deep forward fold engages your hamstrings and adductors significantly, which are muscle groups integral to high kicks, jumps, and various stunts. The stretch can help increase your range of motion, making your movements look more effortless and polished.

pancake stretch
cheerleading stretches

In your routine, these stretches should be complemented with a warm-up to prepare your muscles, and possibly followed by a cool-down to aid recovery. A balanced approach to stretching not only enhances flexibility but also helps in injury prevention, ensuring that you can perform cheerleading routines with both vigor and longevity

Additional Stretching Tips:

  • For hip flexibility, consider pigeon poses and butterfly stretches.
  • Incorporate shoulder stretches and arm circles to enhance arm mobility.
  • Consistency is key. Stretch daily, holding each stretch for at least 30 seconds.
  • Warm up before stretching to prevent injuries.
  • Incorporate dynamic stretching to simulate cheer movements.

Regaining flexibility is a journey that requires dedication, consistency, and the right techniques. By incorporating these stretches and following a disciplined approach, you’ll see improvement in your flexibility, performance, and confidence at tryouts

Steve Pawlyk Signature Full

Need Competition Music Blue

IPP's Premade Mixes are USA Cheer Compliant and customizable!  Add Sound FX, swap songs, & more!  Add your Team Name to the mix for only $10! 

Mastering Toss Hands

mastering-toss-hands cheerleading

By Steve Pawlyk

Published August 14, 2023

Male cheerleaders around the world may face unique challenges, particularly when it comes to performing toss hands. If you are in your early years of cheerleading and struggling with getting the right height on your toss, but seem to have no problem with shoulder sits, you are not alone.

Understand the Role of Strength Training

Lift More Weights: Building strength is key. Focus on the big 3 lifts – deadlifts, squats, and cleans.

  • Deadlifts and Squats: These exercises target the muscles needed for tosses and can significantly enhance your power.
  • Cleans: This is useful for developing explosive strength, but it requires proper technique to be effective.

While coaches often emphasize technique over strength, having more strength to tap into will never be detrimental. It can, in fact, provide an edge in your performance.

cheer lifting weights deadlifts

Deadlifts

Deadlifts are great for building overall strength, targeting muscles in your legs, back, and core. Here’s a step-by-step guide:

1. Starting Position:

  • Stand with feet hip-width apart.
  • Place the barbell over the middle of your feet.
  • Bend at the hips and knees to lower your body to the bar.
  • Grip the bar with both hands, either overhand or mixed grip.
  • Keep your back flat, chest up, and shoulders slightly in front of the bar.

2. Lifting Phase:

  • Engage your core and push through your heels.
  • Extend your hips and knees simultaneously to lift the bar.
  • Keep the bar close to your body, traveling in a straight line.
  • Fully extend your hips at the top, standing tall.

3. Lowering Phase:

  • Reverse the movement, pushing hips back first.
  • Lower the bar by bending the hips and knees.
  • Return to the starting position with control.

4. Key Tips:

  • Maintain a neutral spine throughout the movement.
  • Focus on engaging your glutes and hamstrings.
  • Avoid rounding your back.

Squats

Squats are a cornerstone exercise for building leg and core strength. Follow these steps:

1. Starting Position:

  • Stand with feet shoulder-width apart.
  • Hold a barbell across your upper back or place hands on hips for bodyweight squats.
  • Keep your chest up, shoulders back, and eyes forward.

2. Descending Phase:

  • Begin by pushing your hips back.
  • Bend your knees while keeping them in line with your feet.
  • Lower your body until thighs are at least parallel to the ground.
  • Keep your chest up and back straight throughout the movement.

3. Ascending Phase:

  • Push through your heels to stand back up.
  • Extend hips and knees simultaneously.
  • Return to the starting position, maintaining good posture.

4. Key Tips:

  • Keep your knees from caving in or going past your toes.
  • Engage your core throughout the movement.
  • Focus on controlled, smooth motions.

5. Variations:

  • Goblet Squat with a dumbbell or kettlebell.
  • Front Squat with the barbell in front of your shoulders.
cheerleading weightlifting squats

Both Deadlifts and Squats are powerful exercises that require attention to form and technique. It may be wise to consult with a fitness professional or coach to ensure proper execution, especially if you are new to these movements.

Cleans:

The Clean is a complex and powerful exercise often used by athletes to develop explosive strength. It can be particularly beneficial for cheerleaders who need to enhance their toss ability. Here’s a detailed, step-by-step guide to performing the Clean exercise:

1. Starting Position:

  • Stand with feet shoulder-width apart.
  • Grip the barbell with a hook grip, hands slightly wider than shoulder-width.
  • Position the bar over the mid-foot.
  • Lower yourself by bending at the knees and hips, keeping the chest up.
  • Engage your core and ensure that your back is straight.

2. First Pull:

  • Begin by driving through your heels to lift the bar off the floor.
  • Maintain a flat back and keep the bar close to your body.
  • Extend your legs while keeping your shoulders over the bar.

3. Second Pull (Explosive Phase):

  • As the bar reaches knee height, explosively extend your hips and knees.
  • Shrug your shoulders and pull the bar upward with your arms.
  • Think of “jumping” the bar upwards rather than just lifting it.

4. Catch Phase:

  • Quickly drop under the bar by pulling yourself into a squat position.
  • Rotate your elbows forward to catch the bar on your front shoulders.
  • The bar should rest on your fingertips or the heel of your hand, not the palm.
  • Your thighs should be at least parallel to the ground in the catch position.

5. Recovery Phase:

  • Stand up by pushing through your heels, fully extending your hips and knees.
  • Maintain a straight back and keep the bar in front of your shoulders.

6. Return:

  • Safely lower the barbell back to the starting position or drop it to the floor if using bumper plates.

7. Key Tips:

  • Focus on powerful hip extension rather than pulling with the arms.
  • Keep the bar close to your body throughout the movement.
  • Ensure a smooth transition from the pull to the catch.
  • Practice with lighter weights or a PVC pipe to master the technique before adding weight

Safety Considerations

Given the complexity of the Clean, it may be beneficial to break down the movement into its constituent parts and practice them individually. Working with a certified coach or trainer who understands the biomechanics of the exercise can also help you develop proper form and technique.

Cleans are an advanced lifting technique that requires coordination, timing, and power. They can be a valuable addition to a cheerleader’s training program, helping develop the explosive strength needed for various cheer maneuvers.

Repetition and Understanding Your Flyer

The Reddit user also highlighted the importance of repetition and knowing your flyer’s timing.

  • Repetition: Practicing your toss hands again and again will eventually lead to mastery. Don’t shy away from dedicating time to consistent practice.
  • Understanding Your Flyer: Building synergy with your flyer can make a world of difference. If you understand each other’s timing and movements, you’ll find that executing toss hands becomes much more fluid.

If you’re grappling with toss hands, the combination of targeted weight lifting, repetitive practice, and cultivating a strong understanding with your flyer could be the solution you need.

There’s no one-size-fits-all answer, but these tried and tested methods have proven to be effective for many. With dedication and focus, you too can overcome this challenge and take your skills to new heights.

male cheerleader

Steve Pawlyk Signature Full

Need Competition Music Blue

IPP's Premade Mixes are USA Cheer Compliant and customizable!  Add Sound FX, swap songs, & more!  Add your Team Name to the mix for only $10! 

Enhancing Spatial Awareness for Improved Tumbling in Cheerleading

Enhancing-Spatial-Awareness-for-Improved-Tumbling-in-Cheerleading--A-Comprehensive-Guide

By Steve Pawlyk

Published August 1, 2023

Cheerleading is a demanding sport that requires a high degree of physical strength, agility, and precision. Among these crucial skills, spatial awareness stands out as a significant contributor to a cheerleader’s performance, particularly in tumbling. If you’re a cheerleader finding yourself getting lost mid-full, you’re not alone. We’re here to discuss strategies that can help you refine your spatial awareness and get back on track with your tumbling.

Spatial awareness is a sense of one’s physical position in relation to the surroundings. In cheerleading, it is essential for executing complex tumbling sequences, like standing fulls or full whips, without losing orientation. However, developing and maintaining this sense can be challenging.

Revisit Basics

When struggling with spatial awareness during complex sequences, it can be beneficial to revisit the basics. Try practicing simpler moves and gradually increasing the difficulty. This can help your body regain the sense of spatial orientation and build a solid foundation.

Mental Visualization

Visualize your routines. Before executing a move, imagine each step vividly in your mind. Picture yourself in the air, your rotation, and your landing. This mental rehearsal can help improve your spatial awareness and execution of the skills.

Eye-Focus Training

Try to consciously keep your eyes open during your routines. It’s common for cheerleaders to close their eyes involuntarily during tumbling, which can disrupt spatial orientation. Practice drills where you focus on a particular point during the maneuver can help you stay oriented.

Tumbling-in-Cheerleading-A-Comprehensive-Guide
Spatial-Awareness-for-Improved-Tumbling-in-Cheer

Use Spotting Techniques

Spotting techniques involve focusing on a particular point in your surroundings to maintain balance and orientation. These can be incredibly helpful during full rotations and can prevent you from getting lost mid-move.

Invest in Coaching and Feedback

If you’re still struggling, consider seeking advice from your coach or even investing in additional professional guidance. They can provide personalized feedback, identify problem areas, and suggest targeted exercises to improve your spatial awareness.

Try Proprioceptive Exercises

Proprioceptive exercises that focus on balance and body movement can help improve your spatial awareness. These can include activities like yoga, Pilates, or even specific balance-focused exercises on a stability ball or BOSU.

Refining your spatial awareness as a cheerleader can feel like an uphill battle, but with the right strategies and dedication, you can regain your confidence and excel in your tumbling. Remember, it’s essential to be patient with yourself during this process. Improvements might not be noticeable overnight, but consistent effort will yield results

Steve Pawlyk Signature Full

Need Competition Music Blue

IPP's Premade Mixes are USA Cheer Compliant and customizable!  Add Sound FX, swap songs, & more!  Add your Team Name to the mix for only $10! 

Mastering the Back Walkover: Expert Tips and Drills for Cheerleaders

Mastering the Back Walkover: Expert Tips and Drills for Cheerleaders

By Steve Pawlyk

Published July 14, 2023

Today, we’re addressing a common challenge that many cheerleaders face: mastering the back walkover. This skill is a fundamental part of many routines and can be a hurdle for some athletes. Often cheerleaders struggle with back walkovers, despite regular practice and stretching. So let’s dive into some tips and drills that can help you conquer this move.

Understanding the Back Walkover

The back walkover is a gymnastic skill that requires a combination of strength, flexibility, and balance. It involves starting from a standing position, reaching backwards into a bridge, and then kicking over to return to a standing position. The cheerleader who posted her frustration with this on Reddit mentioned that she can fall into a bridge but struggles with the kick over. This suggests that she may need to focus on building strength and improving technique.

Building Strength

While flexibility is crucial for a back walkover, strength is equally important. You need strong shoulders, back, and core muscles to control your body as you kick over from the bridge position. Here are a few exercises to help build this strength:

1. Planks: Planks are excellent for strengthening your core. Try to hold a plank for 30 seconds to a minute, and gradually increase your time as your strength improves.

2. Push-ups: Push-ups can help build shoulder and arm strength. If regular push-ups are too challenging, start with knee push-ups and gradually progress to full push-ups.

3. Bridge push-ups: These target your shoulders, back, and core. Start in a bridge position and try to push your body up and down.

Cheerleader doing pushups to build core strength for back walkovers

Improving Technique

The technique is key in a back walkover. Here are a few drills to help improve your technique:

Spotter assisting a cheerleader during a back walkover practice

1. Bridge kickovers: Start in a bridge position with your feet on an elevated surface like a mat or a step. Kick over one leg at a time. This drill can help you get the feel of the kickover motion.

2. Spotter-assisted back walkovers: Ask a coach or a teammate to spot you as you attempt your back walkover. They can provide support as you kick over, helping you understand the movement and build confidence.

3. Wall walkovers: Stand a few feet away from a wall, facing away from it. Reach back into a bridge against the wall and use it to push off and kick over. This drill can help you practice the kickover motion with some support.

Increasing Flexibility

Even though our cheerleader friend has been stretching daily, she might need to incorporate some specific stretches to increase her back and shoulder flexibility:

1. Doorway stretch: Stand in an open doorway, place your hands on the door frame slightly above your head, and lean forward to stretch your shoulders.

2. Cobra pose: This yoga pose is great for increasing back flexibility. Lie on your stomach, place your hands under your shoulders, and push your upper body off the ground.

3. Bridge stretch: Regularly practicing your bridge can also help improve your flexibility. Try to hold the position for longer periods and work on straightening your legs and pushing your shoulders over your hands.

Cheerleader-demonstrating-the-bridge-position,-a-crucial-starting-point-for-a-back-walkover

Perfecting the Back Walkover: A Detailed Breakdown

The back walkover can be a challenging skill to master, but breaking it down into smaller, more manageable movements can make it easier to understand and execute. Let’s delve into a more detailed explanation of the back walkover, focusing on the bridge position and the transition to the kickover.

Cheerleader performing a plank exercise to build core strength for back walkovers

The Bridge Position

When you’re in the bridge position, it’s important to push your shoulders forward as far as possible. This movement will naturally start to straighten your legs. The goal here is to create a strong, stable base from which you can initiate the kickover.

The Kickover Transition

Once your legs are close to straight, bring one foot in, so one leg is bent and the other is straight. This is the starting position for the kickover. From here, you’ll want to look at your hands and aggressively push the bent leg straight while lifting the other leg up.

It’s crucial to think of this movement less as a “kick” and more as a “push and swing.” You’re pushing through the bent leg so it extends fully, and simultaneously swinging the straight leg up and over. This combination of movements creates the momentum you need to complete the back walkover.

Working with a Spotter

If you’re still finding the back walkover challenging, working with a spotter can be very helpful. They can provide physical support and guidance as you practice the movement, helping you build confidence and improve your technique.

You can also practice back walkovers going down a cheese mat (an incline mat) with a spotter. The incline can help make the movement easier by using gravity to assist with the momentum. This can be a great way to get a feel for the back walkover and understand how the movements should flow together.

The Back Walkover vs. The Kickover

Interestingly, many cheerleaders find the back walkover easier to perform than a kickover from a bridge. This is because the momentum going backwards in a back walkover naturally makes your legs follow, making the movement feel more fluid and less forced.

So, if you’re struggling with the kickover, try practicing back walkovers instead. You might find that the backwards momentum helps you understand and execute the movement more easily

Remember, mastering a skill like the back walkover takes time, patience, and lots of practice. Don’t be discouraged if you don’t get it right away. Keep practicing, stay consistent with your strength training and stretching, and don’t hesitate to ask for help from your coach or teammates. You’re not alone in this journey, and with dedication and perseverance, you’ll be able to nail that back walkover in no time 👍

cheerleader practicing a back walkover

Steve Pawlyk Signature Full

Need Competition Music Blue

IPP's Premade Mixes are USA Cheer Compliant and customizable!  Add Sound FX, swap songs, & more!  Add your Team Name to the mix for only $10! 

Mastering Cheer Stunting 101: A Comprehensive Guide for New Cheer Coaches

Mastering Cheer Stunting 101: A Comprehensive Guide for New Cheer Coaches

By Steve Pawlyk

Published June 28, 2023

Every cheerleading performance is a mesmerizing blend of rhythm, athleticism, and sheer enthusiasm, with stunting taking center stage. Stunting, the act of lifting a team member during a performance, is not just about the high-flying spectacle; it requires precision, strength, and an intricate understanding of cheerleading guidelines. For any new cheer coach looking to ensure their team’s stunting routines are not only breathtaking but also adhere to American cheerleading rules and regulations, this guide offers a step-by-step breakdown.

Understanding the Key Roles in Cheer Stunting

Each stunt in cheerleading is made possible by the combined effort of the flyer, the bases, the backspot, and, sometimes, the front spot. All roles are bound by the safety guidelines set forth by the American Association of Cheerleading Coaches and Administrators (AACCA) and the U.S. All Star Federation (USASF).

  1. Flyer: Flyers need a solid sense of balance, flexibility, and confidence. They must follow safety guidelines, such as not reaching out to the crowd or performing any dangerous dismounts without proper support.
  2. Bases: Bases must be strong enough to lift and catch the flyer. They should always watch the flyer and not the crowd or competition, as stipulated by AACCA safety guidelines.
  3. Backspot: The backspot’s responsibility extends to ensuring the stunt’s timing, protecting the flyer’s head and neck, and maintaining constant awareness of the stunt group’s stability.
  4. Front Spot: This optional role can add an extra layer of safety, aiding in lifting the flyer, and providing additional stability to the stunt.
Mastering Cheer Stunting 101

Stunt Conditioning Drills: Building Strength and Stability

The next step is conditioning your cheerleaders for stunting. Strength, flexibility, and balance exercises should be part of your team’s regular workout regimen, in line with the conditioning guidelines of the USASF.

  1. Core Strength Exercises: The core is fundamental for all stunting roles. Exercises such as planks, sit-ups, and Russian twists can help build core strength.
  2. Leg and Arm Strength Workouts: Squats, lunges, and push-ups can help bases and spotters develop the power they need to support flyers.
  3. Balance Drills: Balance exercises, such as yoga poses or balance beam exercises, are important for flyers to maintain their poise while aloft.
  4. Flexibility Training: Stretching routines, straddle stretches, and split routines help flyers achieve the flexibility they need to perform various stunts.
Cheerleading Stunts

Stunt Progressions: Learning to Stunt Safely

Safety is paramount in cheerleading, and stunt progressions allow your squad to build confidence and skills while adhering to the AACCA’s risk management guidelines. Here are a few progression steps:

  1. Thigh Stand: This beginner-friendly stunt helps team members understand the basics of balance and coordination.
  2. Prep or Half Elevator: Here, the flyer stands on the bases’ hands at chest level. This stunt introduces height and requires more strength from bases.
  3. Full Elevator or Extension: This full-height stunt is a test of your team’s stunting abilities and should only be performed once the other levels are mastered.

It is essential to incorporate these progressions into your training regimen, making sure to adhere to the USASF Level Rules and Age Grids.

When teaching stunts, remember that every cheerleader’s safety is your priority. Use appropriate safety mats and spotting until your squad is fully comfortable with their stunts. As a cheer coach, your primary goal should be to foster an environment where your cheerleaders can safely learn, grow, and shine under your guidance.

The art of stunting is one of the many elements that make cheerleading performances compelling and breathtaking. By incorporating the right drills, exercises, and safety practices into your coaching, and always adhering to the cheerleading rules and regulations, you can ensure your squad delivers not just a great performance, but a safe one. Keep the spirit high, the music inspiring, and let the joy of cheerleading resonate with every stunt your team executes.

Steve Pawlyk Signature Full

Need Competition Music Blue

IPP's Premade Mixes are USA Cheer Compliant and customizable!  Add Sound FX, swap songs, & more!  Add your Team Name to the mix for only $10! 

SHARE YOUR CART